This document is about OpenWebRX+, an improved and extended version of the original OpenWebRX web-based SDR radio. For casual radio listeners, it explains how to use online OpenWebRX+ receivers and what you can do with them. For those interested in hosting their own OpenWebRX+ receiver, there are installation instructions and advice for selecting the hardware.
OpenWebRX+ adds many features missing from the original OpenWebRX, such as noise reduction, tuning steps, scanner, keyboard shortcuts, improved user interface and maps, and decoders for many digital communication protocols. Please note that the following document covers both the original OpenWebRX and the extended OpenWebRX+. Features specific to OpenWebRX+ are marked so.
Public receivers are located all over the globe and can be found via the ReceiverBook website.
Binary packages for the latest Ubuntu and Debian Linux can be installed from this package repository. Please, carefully read the instructions there before trying to install. The correct installation should completely and cleanly replace the original OpenWebRX packages, if they are installed on your system.
The source code is available from my Github account. Most development happens in the "master" branches of the relevant repos, such as csdr, pycsdr, owrx_connector, and openwebrx. Some packages are reused from the "master" branches of the original OpenWebRX repos without changes.
News and announcements are posted to a Telegram channel. The support and discussion occurs in a Telegram chat.
Since OpenWebRX is a server designed to share SDR resources among multiple users, its operation is somewhat different from regular SDR applications. This section explains the basics of OpenWebRX usage, including the main display and controls.
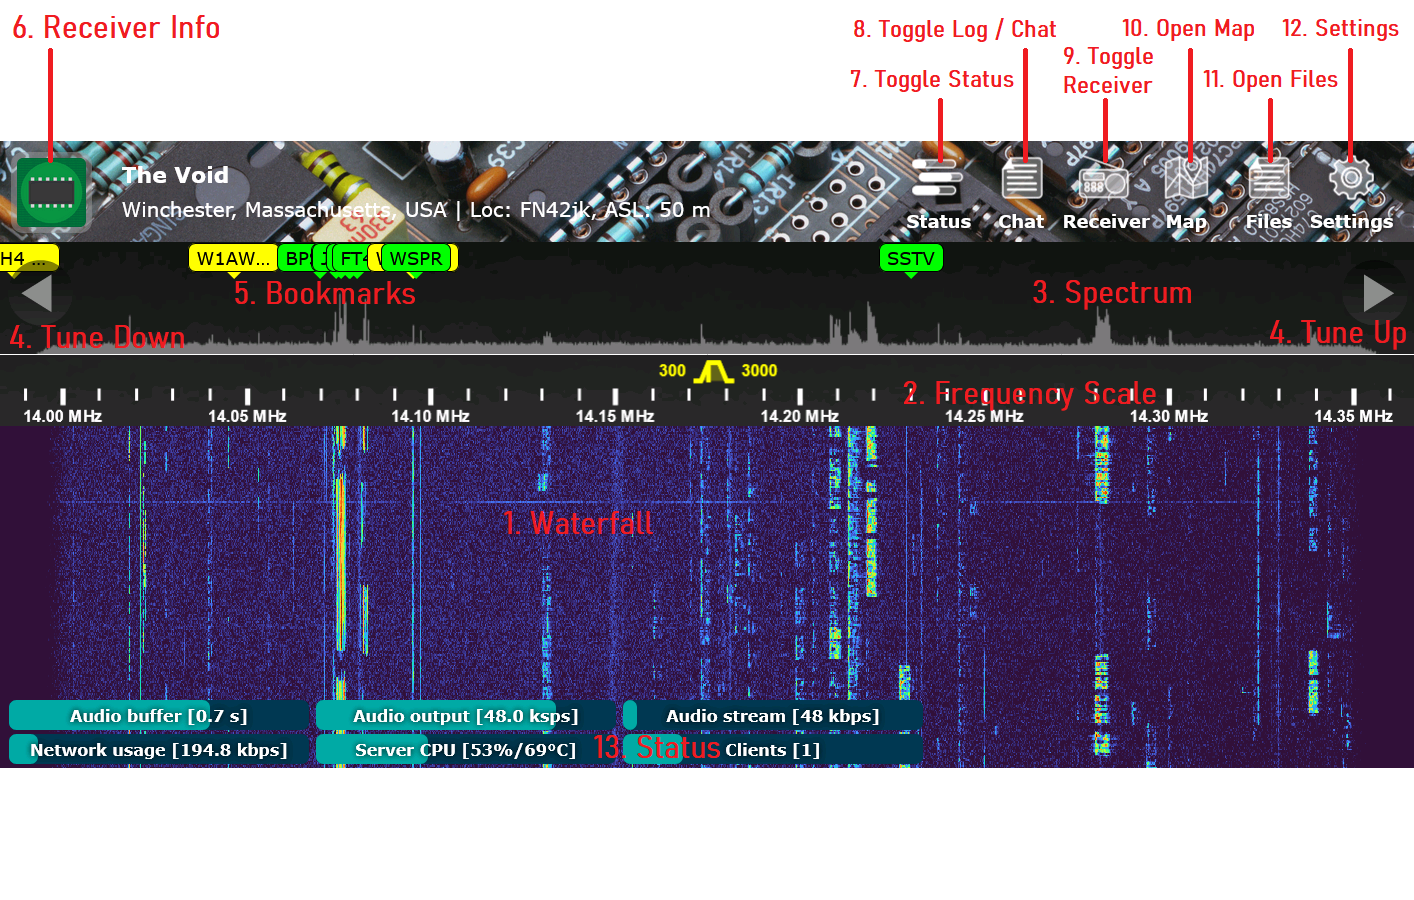
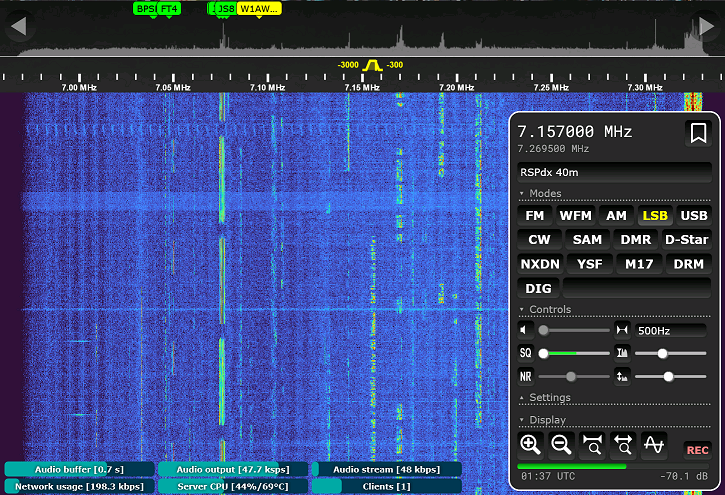
The scrolling waterfall shows the band activity in your currently selected SDR profile. The waterfall colors represent signal levels at each frequency, with brighter colors corresponding to stronger signals. Thus, a strong, healthy, ongoing signal will look like a bright vertical stripe at the waterfall. Different signal modulations produce differently shaped stripes. See Signal Identification Guide for examples.
The frequency scale shows the actual frequencies, as well as the currently tuned frequency, represented with the yellow caret. This is the frequency you are currently listening to. The numbers at the caret sides stand for the current filter bounds. You can change these bounds by dragging the caret sides.
The spectrum display, found in OpenWebRX+, shows the current signal level at each frequency, as opposed to the historic level shown by the waterfall. The spectrum display has a little bit of latency, to make sure that short signals still leave their mark on the spectrum.
The step-tuning buttons let you tune up and down the frequency scale by left-clicking them. With the "side-stepping" feature enabled, you can also right-click these buttons to step outside your currently selected profile.
The bookmarks let you quickly tune to previously bookmarked frequencies. There are three types of bookmarks in OpenWebRX:
The receiver information is shown by clicking the icon at the top-left page corner. This information is filled in by the administrator and includes receiver's name, location and the hardware description.
The Status button toggles the status bar shown at the bottom of the receiver web page.
The Chat button toggles the log and chat panel shown at the bottom of the receiver web page. If the administrator has chosen to disable chat functionality, this button will turn into Log, opening the non-interactive log panel instead.
The Receiver button toggles the main control panel for the receiver.
The Map button opens the map page showing radio stations, repeaters, other online receivers, and position reports from various sources, such as airplanes, ships, and HAM operators.
The Files button opens the file browser page with the most recently received SSTV images, faxes, and other data.
The Settings button opens the password protected settings page for configuring OpenWebRX. Normally, only server administrator needs to access the server settings.
The status bar at the bottom of receiver's page displays the current status of the server and its connection to your web browser. Various panels show network throughput, server CPU load and temperature, audio sampling rate, and so on.

This is the currently tuned frequency of the receiver. You can change it by clicking on the waterfall, the bookmarks, or by entering it directly into this field. The frequency can only be changed within the current profile bounds.
Click this button to bookmark your current frequency. The new bookmark will be stored locally in your browser and appear as a blue marker above the waterfall.
This is the current profile, including the SDR device name ("RSPdx"). OpenWebRX supports multiple SDR devices with multiple profiles for each device. When selecting a new profile, remember that it will change for all users of the same SDR device, so be considerate when you see somebody else using the server.
This is the list of all available audio modulation modes. Select the new mode by clicking the corresponding button, but keep in mind that not all modes can be applicable. It helps to know what each modulation looks like on the waterfall. Consult the Signal Identification Guide if unsure.
This is the current audio modulation mode, highlighted in yellow.
This button will light up if a digital decoder is active. Click it to toggle digital decoding off.
This is the current digital decoding mode, if active. You can select a new digital decoding mode from the list here, but keep in mind that not all modes can be applicable. It helps to know what each digital mode looks like on the waterfall. Consult the Signal Identification Guide if unsure.
Use this slider to control audio volume. Click the speaker button to mute or unmute audio.
Use this slider to set the squelch threshold. Left-click the SQ button to toggle squelch on and off. When the squelch is on, any audio that is below the selected squelch threshold will be muted.
Right-clicking the SQ button toggles the frequency scanner, making SQ button glow green. The scanner will automatically check all bookmarked frequencies for signals that are above the squelch threshold and tune to them. Once a signal disappears, the scanner will continue checking bookmarks for more signals.
Use this slider to set the noise reduction threshold. Click the NR button to toggle noise reduction on and off. The noise reduction algorithm works on the spectral subtraction principle. It will remove any frequencies that are below the selected threshold from the audio, reducing the background noise. Remember that excessive use of noise reduction may distort or muffle the useful sounds though.
The tuning step selector lets you choose the frequency tuning granularity. For example, if 1kHz step is selected, the frequency will always tune in 1kHz increments. Different profiles may assume different default tuning steps, such as 5kHz for shortwave broadcasters or 500Hz for HAM operators using SSB modulation. Click the adjacent button to reset tuning step to its default value for the current profile.
This slider sets the signal level for the "hottest" waterfall color (usually red). Set it higher when looking at strong signals, lower when looking at weak signals.
Left-click the adjacent button to make a one-time automatic adjustment of the waterfall colors. Right-click the button to toggle continuous automatic adjustment of the waterfall colors.
This slider sets the signal level for the "coldest" waterfall color (usually blue). Set it higher when looking at strong signals, lower when looking at weak signals.
Left-click the adjacent button to reset waterfall colors to their default values.
This drop-down list lets you choose one of the user interface themes. Clicking the adjacent button resets user interface to the default theme.
This drop-down list lets you choose one of the waterfall color themes. Clicking the adjacent button resets waterfall to the default theme.
This slider controls the user interface opacity, making panels more or less visible on top of the waterfall. Click the adjacent button to reset user interface to the full opacity.
The four zoom buttons let you zoom waterfall in and out. Zooming always happens around the currently tuned frequency, keeping it on display.
The clock at the bottom of the main panel shows the current Universal Coordinated Time (UTC). Most of the OpenWebRX user interface operates in UTC, so this clock is shown for easier reference.
This button toggles the live spectrum display above the waterfall. When using it, keep in mind that the spectrum display may make your web browser use a lot of processor power.
Click the REC button to start recording audio at any moment. The button will glow red, indicating ongoing recording. Once you click the REC button again, it will stop recording and save the recorded audio to a file.
The bar at the bottom indicates the current signal level. It will change color based on what OpenWebRX considers signal overload. There is also a numeric readout, showing the exact value in decibels.
OpenWebRX requires the use of the right mouse button. On devices with a single mouse button (such as Apple computers), the right mouse button is simulated by holding the CONTROL key with a mouse click.
On touch-based devices, such as smartphones and tablets, the right mouse button is simulated by holding the spot with your finger for a little bit longer than usual.
The mouse scroll wheel operates in two modes: normal and modified (with the right mouse button, the wheel button, or the SHIFT key pressed):
In the waterfall:
Normal wheel spin tunes frequency, modified wheel spin changes zoom
factor. This behavior can be reversed with a checkbox found in the
receiver panel.
In the frequency scale:
Both normal and modified wheel spins tune frequency.
At the bandpass filter (yellow caret):
Normal wheel spin shifts filter left or right, modified wheel spin makes
filter wider or narrower.
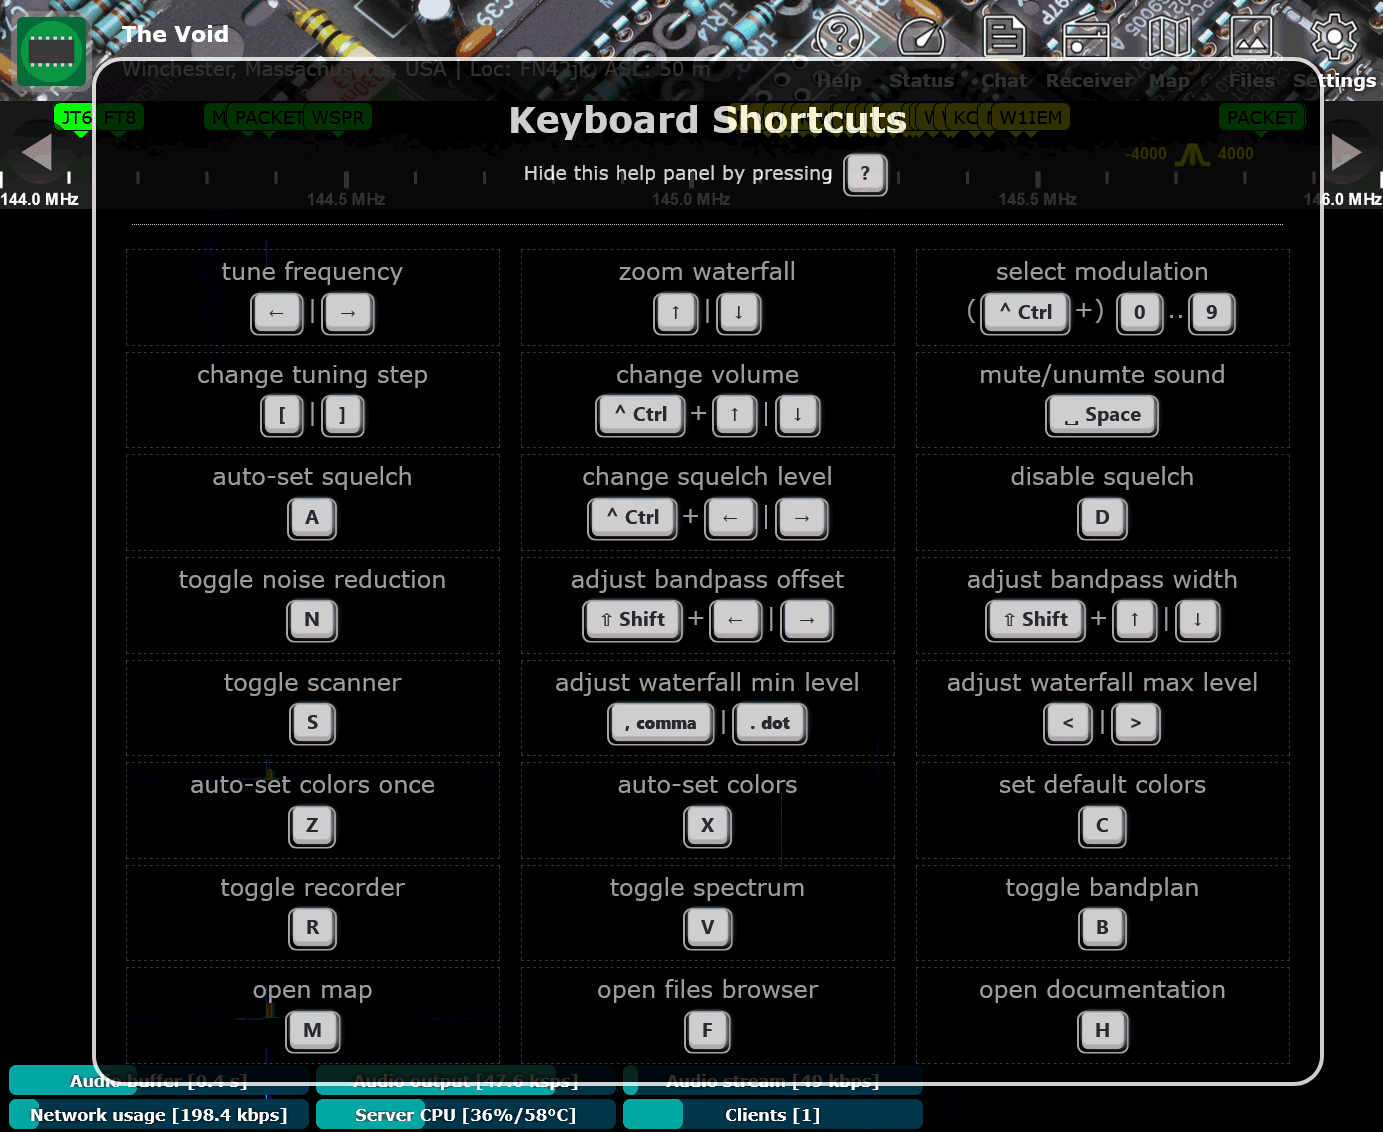
OpenWebRX+ includes keyboard shortcuts for accessing the most common interface functions. To see the complete list of shortcuts, press the ? key, which opens the following panel:
The OpenWebRX+ includes a frequency scanner that can monitor currently shown bookmarks for activity. When the scanner detects a signal at one of the bookmarked frequencies, it will tune to that frequency. Once that frequency goes quiet, the scanner goes back to monitoring all shown bookmarks. In order to use the scanner, do the following:
Tune to an empty part of the waterfall and left-click the SQ button in order to set the squelch level.
Right-click the SQ button to start scanning. The SQ button will glow green indicating that the scanner is on. Mobile device users can simply hold the button down for a longer time to simulate the right-click.
Once done, right-click the SQ button again to disable the scanner.
Please, keep in mind that the scanner will not work on digital voice channels, since they tend to keep signal on even if there is no actual traffic on a channel.
OpenWebRX+ includes a simple chat that lets connected users talk to each other. The chat panel opens by pressing the Chat button at the top of the receiver web page.
When you send your first chat message by entering it at the bottom of the chat window, OpenWebRX+ will assign you a random nickname, shown to other users next to your messages. To change your name, enter your new nickname at the left of the message input.
The server administrator can disable chat functionality via the settings. When disabled, the Chat button turns into the Log button, with the log panel not accepting any input from users.
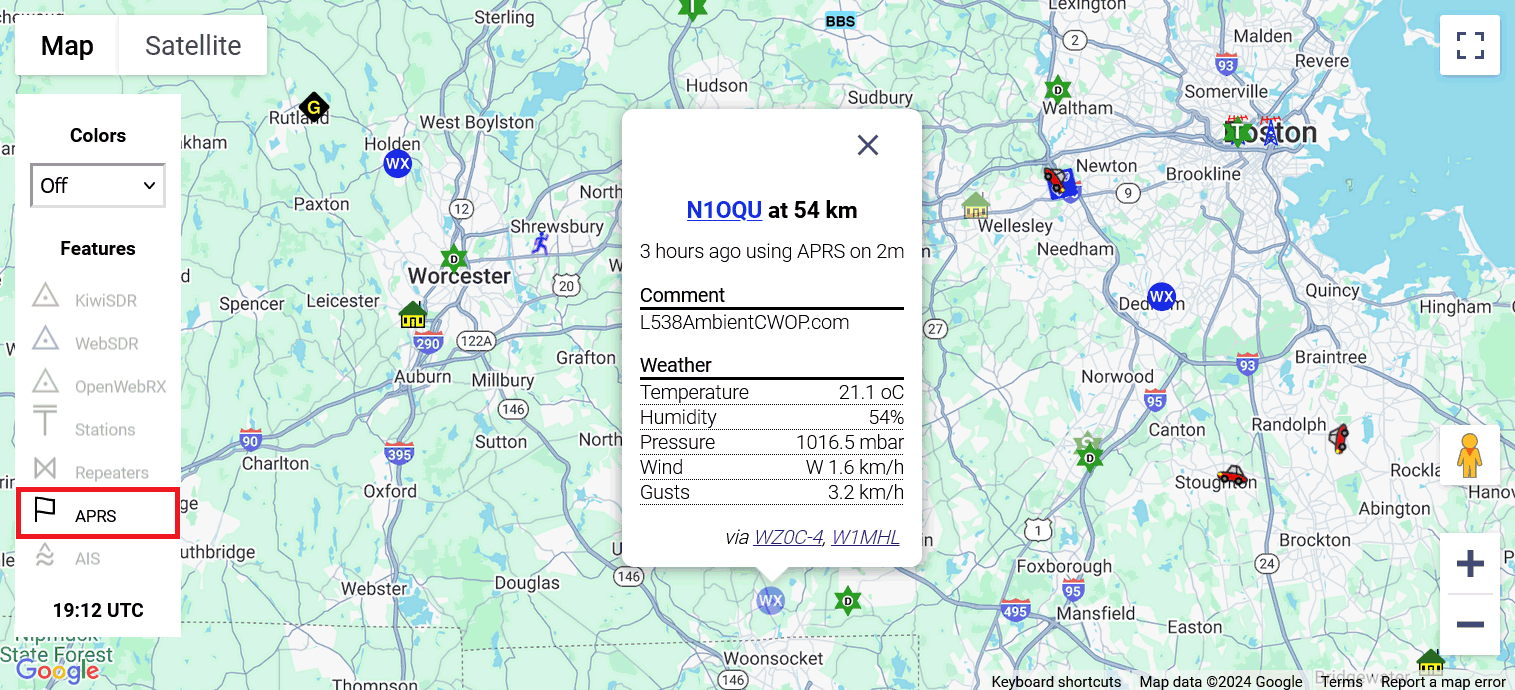
OpenWebRX has a map display showing the received data, such as ship and airplane locations, APRS reports, and digital HAM messages. You can reveal the map by clicking the Map button at the top of the browser window.
OpenWebRX+ offers two map types: Google Maps and a collection of free maps based on the Leaflet library. The very popular OpenStreetMap is a part of that collection. You can switch between map types by clicking the Map button at the top of the browser window.
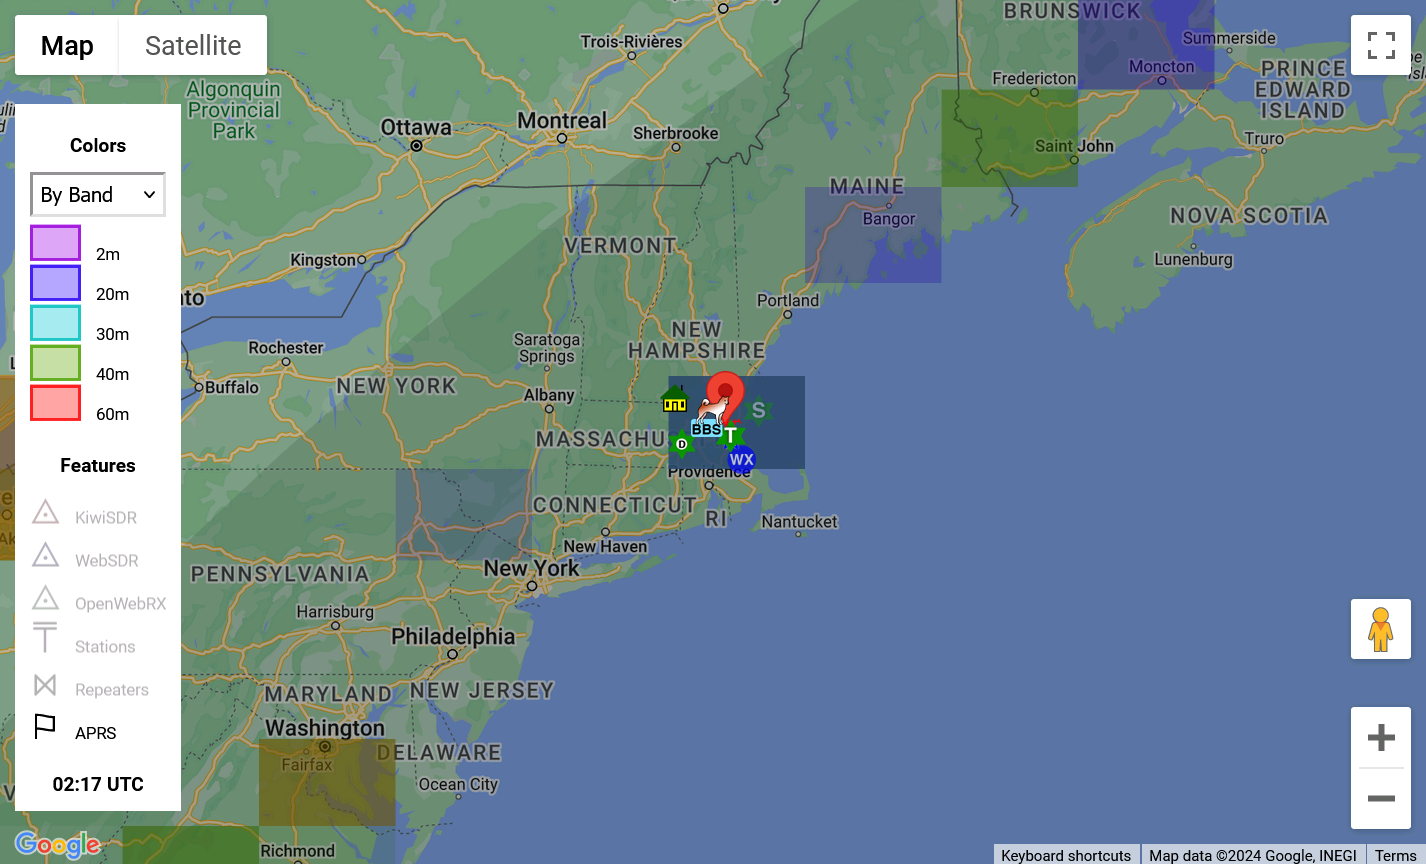
The above image shows OpenWebRX+ Google Maps interface. Aside from the regular navigation controls, this interface presents a toolbox at the left side with toggle switches for different kinds of data. New switches will appear as OpenWebRX receives new kinds of data, such as ship or aircraft positions for example.
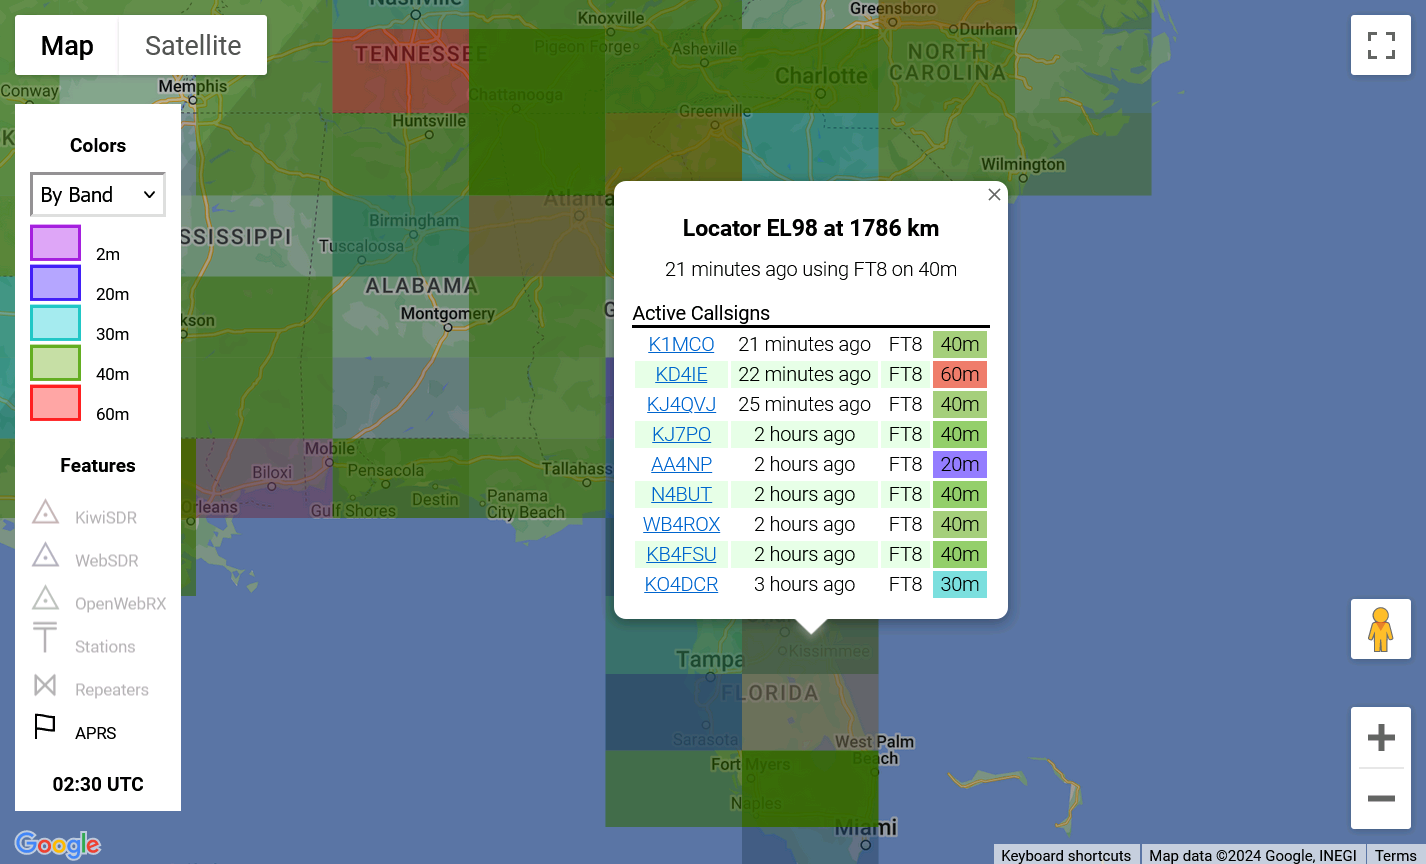
The large red marker indicates the receiver location. Colored "locator" squares represent origins of digital HAM transmissions, such as FT8, FT4, or WSPR reports, with each elemental color representing either frequency (when "By Band" selected) or mode (when "By Mode" selected). Individual colors can be clicked on and off in the toolbox.
By clicking on a colored locator square, you can see all the reports received from its location, as shown below. The information bubble also indicates locator's name (using Maidenhead System), its distance from the receiver, and the time last report has been received from this locator.
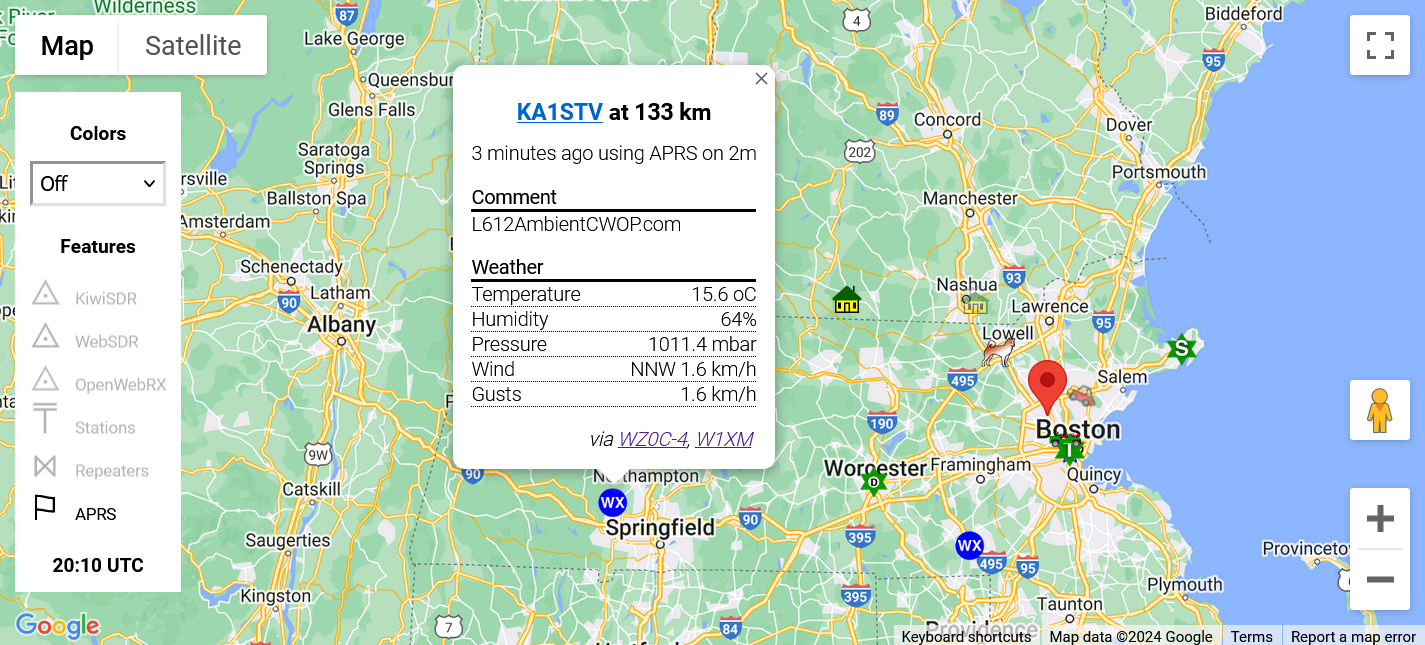
By clicking on a marker, you can see marker-specific information, such as APRS weather report shown below. The information bubble also indicates marker's name (e.g. HAM callsign), its distance from the receiver, and the last time information has been received about this marker. When relevant, OpenWebRX+ will also indicate the path information travelled, as seen at the bottom of the information bubble.
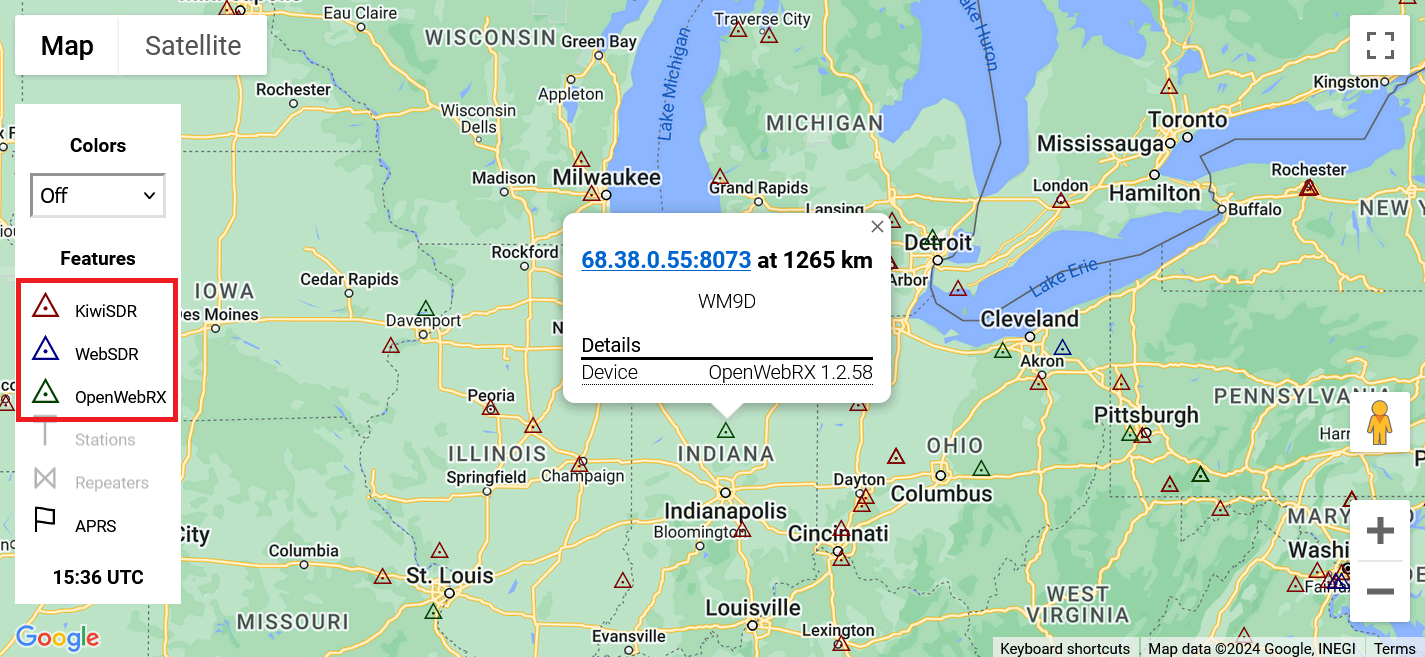
OpenWebRX+ will periodically query ReceiverBook, KiwiSDR, and WebSDR.org sites for other online SDR receivers. These receivers are indicated on the map with ◬ markers, as shown below. Red markers stand for KiwiSDR receivers, green markers correspond to OpenWebRX receivers, while blue markers designate the original WebSDR receivers. Clicking on a marker brings up the general information about the receiver, along with a link to receiver's web page.
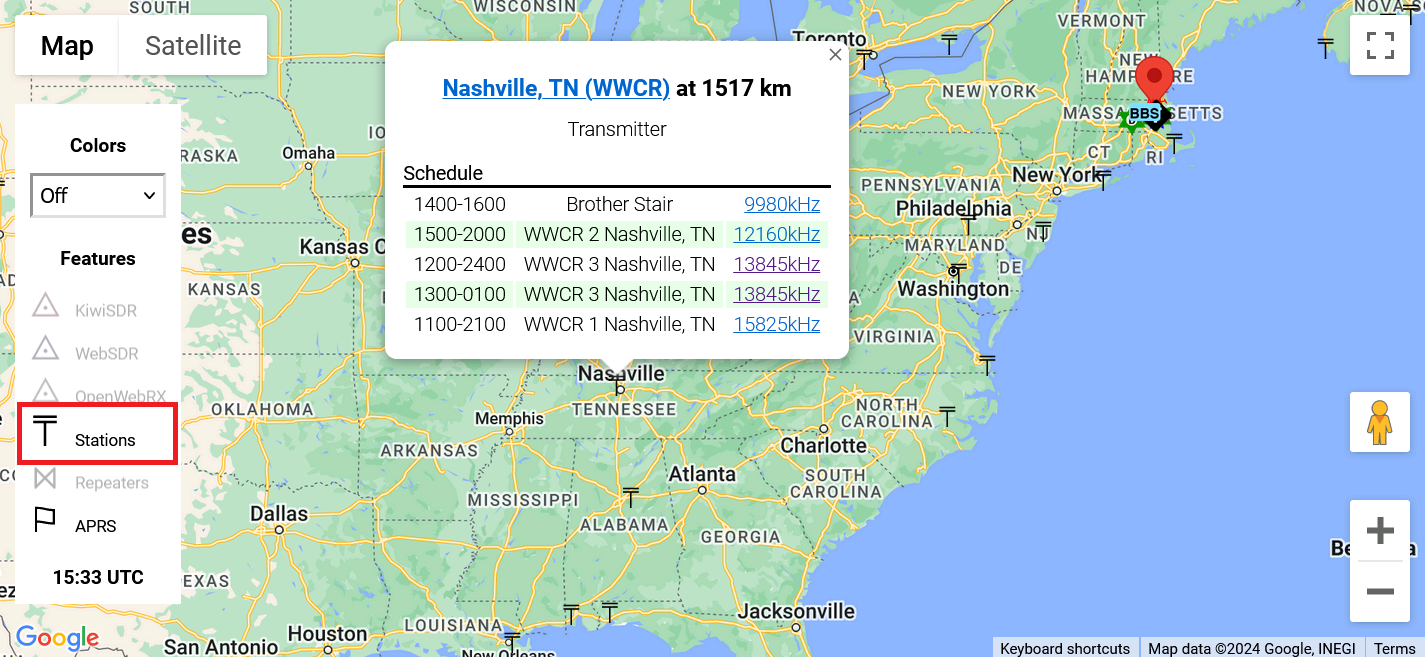
Once a day, OpenWebRX+ queries the EiBi database for shortwave broadcast schedules. Currently broadcasting stations are indicated with ⍑ markers on the map, as shown above. Clicking on a station brings up its schedule, with frequencies and broadcast times. OpenWebRX+ will tune to clicked frequencies, as long as they are within the profile you are listening to.
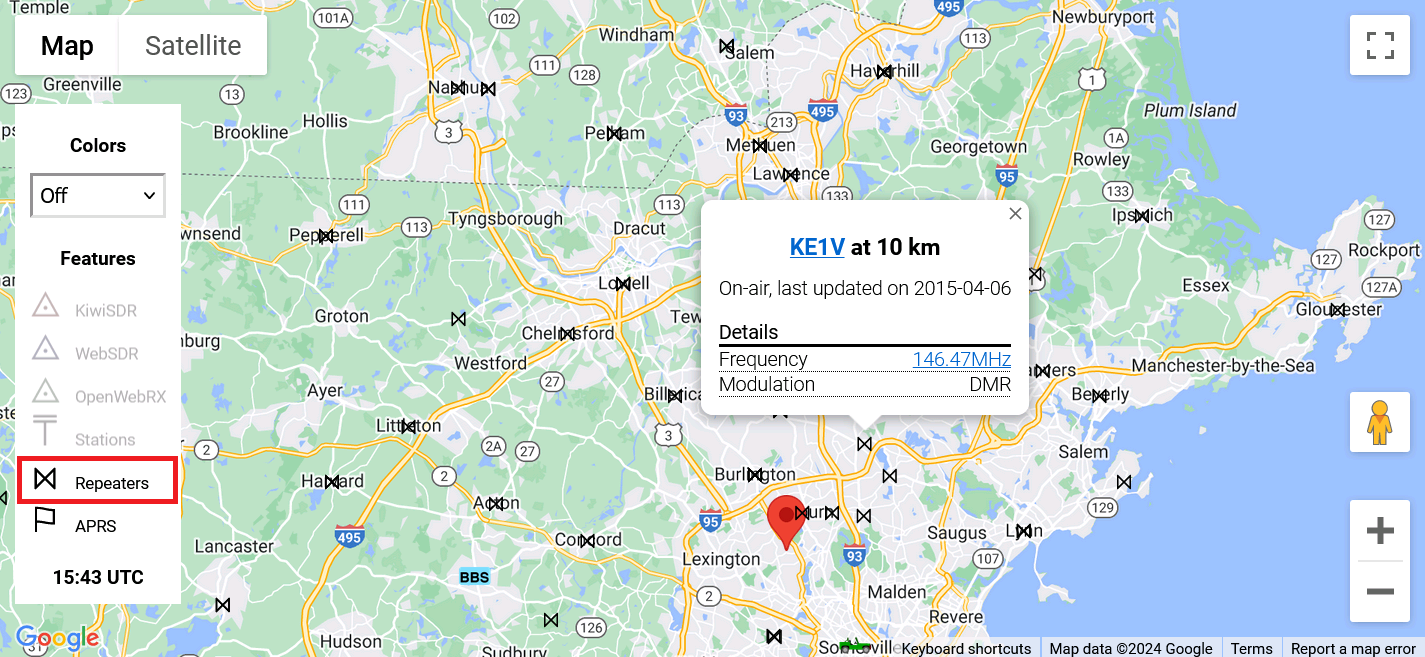
Once a day, OpenWebRX+ queries RepeaterBook.com for the list of repeaters closest to the receiver location. These repeaters are indicated with ⋈ markers on the map, as shown below.
In this section, we will go over common radio broadcasting types and how to use OpenWebRX to listen to the broadcast radio.
The FM broadcasts generally occur between 76MHz and 108MHz. Each broadcaster is allocated 100kHz of spectrum, unless they are in the US where 200kHz is allocated to each station. FM broadcasts may reach distances up to 100km, limited by the horizon line. If you live in the US, the closest FM stations can be found via the Radio Locator website.
In order to listen to FM broadcasts in OpenWebRX, select a profile containing above frequencies, press the WFM button at the receiver panel, and tune to one of the signals. Please note that OpenWebRX only plays mono sound, so there will not be any stereo.
OpenWebRX also allows to decode textual RDS information sent within FM broadcasts, such as station name, program name and type, and so on. If enabled, this information shows up in a box at the bottom of the waterfall.
Since RDS data is encoded slightly differently in the US, compared to Europe, you may want to go to "Settings | Demodulation and Decoding | Miscellaneous" and change the "Decode USA-specific RDS information from WFM broadcasts" option to reflect your receiver location.
By "AM", people generally mean radio broadcasts occurring in the LW and MW bands, between 100kHz and 1800kHz. Each station is allocated 10kHz of the spectrum. During the day, AM broadcasts may reach up to 200km, but this distance greatly increases during the night. If you live in the US, the closest AM stations can be found via the Radio Locator website.
In order to listen to AM broadcasts in OpenWebRX, select a profile containing above frequencies, press the AM button at the receiver panel, and tune to one of the signals. If the signal you are interested in is obscured by adjacent signals, try using the SAM button instead. It has the same effect as AM, but uses a different algorithm more resistant to interference.
"Shortwave" describes multiple bands between 1800kHz and 30MHz used by radio broadcasters, amateurs, and professionals alike. The SWL activity generally refers to shortwave broadcast listening though, with broadcasters easily reaching across thousands of kilometers using AM modulation. Global shortwave broadcast schedules can be found at the Shortwave Info and Shortwave Schedule websites.
In order to listen to shortwave broadcasts in OpenWebRX, select a profile containing the shortwave band you are interested in, press the AM button at the receiver panel, and tune to one of the signals. If the signal is obscured by adjacent signals, try using the SAM button instead. It has the same effect as AM, but uses a different algorithm more resistant to interference.
Some shortwave broadcasters have started to use Digital Radio Mondiale (DRM) for their broadcasts. If you see a clearly digital signal at a shortwave band, try tuning to it, pressing the DRM button, and waiting 30-40 seconds for the decoder to sync. DRM broadcasts are somewhat rare at the moment though.
Once a day, OpenWebRX+ queries the EiBi database for shortwave broadcast schedules. Currently broadcasting stations are indicated with ⍑ markers on the map and with bookmarks in the main receiver window.
Many American FM broadcasters are now using a form of digital radio known as HDRadio or NRSC5. The HDRadio signal, showing up as two thick "columns" around a traditional WFM signal, adds up to four digital channels to each analog FM broadcast.
HDRadio decoding requires a lot of CPU power and will not work on slower computers, or wide profiles. In order to listen to HDRadio in OpenWebRX+, tune to an "enhanced" WFM signal and click on the HDR button. Once the decoder syncs with the signal, the station information and the channel selector should show up at the bottom of the waterfall.
Where American broadcasters use HDRadio, European FM broadcasters use a different digital standard known as DAB. Each DAB multiplex signal essentially occupies a single old analog TV channel and transmits many individual radio station signals at once.
DAB decoding requires a lot of CPU power and will not work on slower computers, or wide profiles. In order to listen to DAB in OpenWebRX, tune to a DAB multiplex signal and click on the DAB button. Once the decoder syncs up with the signal, the station information and the station selector should show up at the bottom of the waterfall.
This section discusses amateur (HAM) radio uses and how to use OpenWebRX to listen to the amateur radio.
Citizens Band (CB) generally covers a swath of spectrum between 27MHz and 28MHz, where individuals can communicate without a license, as long as they adhere to a few rules. The exact boundaries of the CB band differ from country to country. It sits adjacent to the 10m amateur band.
In most places, the CB band is divided into 40 channels (CB1 to CB40), spaced at 10kHz. OpenWebRX+ provides default bookmarks for these channels. While all analog voice modes (AM, FM, LSB, USB) were originally allowed on CB, the US users generally prefer AM at lower channels and LSB at upper channels. In the UK, where AM has been banned until recently, FM is the most common CB mode.
In order to listen to CB in OpenWebRX, select a profile containing the CB band and tune to one of the signals by clicking on the waterfall or a bookmark. You may then have to press AM, FM, LSB, or USB button at the receiver panel, depending on the modulation type used by the transmission you are listening to.
The amateur radio operators (HAMs) are found at 160m, 80m, 40m, 20m, and a few other shortwave bands. All kinds of activities happen at these bands, from Morse code, to voice, to digital communications.
Each amateur band is usually broken into three parts:
Right above the Morse code, there is a bunch of digital transmissions in different modes, such as RTTY, FT8, FT4, and so on. A lot of these modes operate at fixed frequencies, which are included into OpenWebRX band plan and thus show up as green bookmarks.
The rest of a band is allocated for the voice (or "telephone") transmissions using LSB or USB modulation, with some AM sprinkled in. The LSB modulation is used below 20m, while USB is used at 20m and above.
In order to listen to amateur radio operators in OpenWebRX, select a profile containing the HAM band you are interested in, press the LSB or USB button at the receiver panel and tune to one of the signals. While most amateur transmissions occur at 1kHz boundaries, you may have to tune more precisely to get cleaner sound.
Most Morse code (CW) transmissions occur at the lower end of amateur radio bands, such as 3500-3600kHz, 7000-7100kHz, 14000-14100kHz, and so on. To engage the CW mode in OpenWebRX, press the CW button at the receiver panel. In this mode, the bandpass filter shrinks to 700-900Hz range for better selectivity. Also, when in CW mode, OpenWebRX+ will tune 800Hz below clicked carrier frequency, to make sure that the carrier is always heard.
For those who do not understand Morse code, OpenWebRX+ offers automated CW decoding, enabled by selecting the "CW Decoder" digital mode. The CW decoder presents you with a zoomed secondary waterfall that may contain multiple CW signals. Once you click on a CW signal you are interested in, the decoded text will show up below the secondary waterfall, with unrecognized characters shown as underscores.
You can also make the CW decoder show the original dits and dahs it is decoding. To do that, go to "Settings | Demodulation and Decoding | Miscellaneous" and enable the "Show CW codes (dits / dahs) when decoding CW" option.
Finally, OpenWebRX+ can attempt decoding all CW transmissions in 48kHz of spectrum, at once, in real time, and present them to you in a table, sorted by frequency. This functionality is enabled by selecting the "CW Skimmer" digital mode.
CW skimmer support requires installing the CSDR Skimmer package. Please, refer to "Settings | Feature Report" for further instructions.
A teletype transmission consists of two carrier signals, where one signal designates "spaces" (or zeros), while the other signal designates "marks" (or ones). Five bits in a row make a character, encoded with Baudot code. Hence, there are three important parameters describing an RTTY transmission:
Bandwidth (Hz)
This is the distance, in hertz, between two carrier signals. Common
bandwidths are 85Hz, 170Hz, 450Hz, and 650Hz.
Bitrate (baud)
This is the transmission speed, determining how many bits per second are
being sent. Common bitrates are 45bd, 45.45bd, 50bd, 75bd, and 100bd.
Reverse
The "reverse" option, when applied, flips the meanings of "space" and
"mark" frequencies.
OpenWebRX+ comes with three different RTTY settings, selected via digital mode drop-down list:
RTTY-170 (45)
This is the mode commonly used by HAM operators, with 170Hz bandwidth
and 45bd bitrate. You can find transmissions in this mode just above
Morse code transmissions on most HAM HF bands.
RTTY-450 (50N)
This mode is used by the German weather service, most often found at the
10100kHz frequency. OpenWebRX+ includes default (yellow) bookmarks for
this and other German weather RTTY frequencies. This mode uses 450Hz
bandwidth and 50bd bitrate, with "mark" and "space" frequencies
reversed.
RTTY-85 (50N)
This mode is often used at the LF and VLF bands, where available
bandwidth is limited. It has 85Hz bandwidth and 50bd bitrate, with
"mark" and "space" frequencies reversed.
In order to receive a teletype transmission in OpenWebRX+, press the USB button at the receiver panel and tune to an RTTY transmission, which looks like two signals close together. Then select one of the RTTY decoders described above. It will present you with a zoomed secondary waterfall that may contain multiple RTTY signals. Once you click on an RTTY signal you are interested in, the decoded text will show up below the secondary waterfall, with unrecognized characters shown as underscores.
OpenWebRX+ can also attempt decoding all RTTY-170 transmissions in 48kHz of spectrum, at once, in real time, and present them to you in a table, sorted by frequency. This functionality is enabled by selecting the "RTTY Skimmer" digital mode.
RTTY skimmer support requires installing the CSDR Skimmer package. Please, refer to "Settings | Feature Report" for further instructions.
The slow scan television (SSTV) protocol lets radio amateurs exchange small static images over airwaves. Most SSTV frequencies are listed in the OpenWebRX+ band plan and will thus show up as green bookmarks. In order to reliably receive SSTV images in OpenWebRX+, do the following:
Select "SSTV" digital mode and tune exactly 1900Hz below the SSTV carrier frequency, or use any of the provided SSTV bookmarks.
Wait until the next SSTV transmission starts. OpenWebRX+ will not receive partial SSTV transmissions since it needs to obtain the image format information from the transmission header.
The received SSTV images will show up in a separate panel on top of the waterfall display. Click on an image to download it to your computer or mobile device.
OpenWebRX+ supports the following SSTV formats:
The Automatic Packet Reporting System (APRS) lets HAM operators exchange digital data, messages, and share their locations with the world. The APRS uses 144.39MHz frequency in the North America, 144.8MHz in Europe. Please note that the OpenWebRX band plan only has European APRS frequency enabled. If your receiver is in the North America, edit the band plan to switch to the 144.39MHz frequency.
In order to monitor APRS traffic in OpenWebRX, select "Packet" digital mode and tune to one of the above frequencies. You will see decoded APRS messages in a separate panel on top of the waterfall display. Moreover, the sources of these messages will pop up at the map, shown by clicking the Map button.
OpenWebRX+ band plan includes one more APRS entry, at 145.825MHz. This is the International Space Station (ISS) frequency. Several times a day, as ISS flies above the receiver location, you can expect to see APRS reports from really far away at this frequency. These reports are retransmitted by the APRS repeater located at the ISS.
In this section, we are looking at digital radio transmissions that can be heard and decoded with OpenWebRX.
Today, the HF radio fax protocol is mainly used to broadcast weather maps and related information to vessels at sea. The US National Weather Service regularly publishes weather fax schedules you can use to tune to a nearby fax broadcast. Also, OpenWebRX+ provides default (yellow) bookmarks for most known weather fax frequencies. In order to reliably receive a fax in OpenWebRX+, do the following:
Select "FAX" digital mode and tune exactly 1900Hz below the fax carrier frequency, or use any of the provided fax bookmarks.
Wait until the next fax transmission starts. OpenWebRX+ will not receive partial fax transmissions since it needs to obtain the image format information from the transmission header.
The received fax images will show up in a separate panel on top of the waterfall display. Click on an image to download it to your computer or mobile device.
The fax decoder inside OpenWebRX+ supports 120LPM transmissions in IOC576 and IOC288 formats. As an administrator, you have some control over fax decoding. Following options are available in "Settings | General | Demodulation and Decoding | Fax Transmissions":
Transmission speed
The transmission speed controls how many fax lines per minute the
decoder is going expect. The most common value is 120LPM. Do not
change it unless you are absolutely sure you need a different one.
Post-process received images to reduce noise
When enabled, this option makes fax decoder post-process received images
for better contrast. Some grayscale gradients may get lost as result
though.
Receive color images
This experimental option should allow OpenWebRX+ receive color faxes. It
has not been tested due to lack of samples though.
Use amplitude modulation
This experimental option lets OpenWebRX+ receive faxes encoded using AM
mode, rather than usual USB. So far, it has not been tested due to lack
of samples.
While mostly an outdated technology, wireless pagers are still in use at hospitals, businesses, and for automated reporting. Pager traffic is commonly found at 150-165MHz, as well as other VHF and UHF bands. OpenWebRX+ can decode both POCSAG and FLEX paging protocols at different speeds.
Keep in mind that your local laws may prohibit you from listening to the pager traffic. Please, check before you do!
In order to monitor pager messages in OpenWebRX+, select "Page" digital mode and tune to the exact middle of a pager signal. You will see decoded pager messages in a separate panel on top of the waterfall display.
A lot of pager messages carry numeric or binary data. As an administrator, you can choose to ignore these unreadable messages by going to "Settings | General | Demodulation and Decoding | Miscellaneous" and enabling the "Filter out empty, numeric, or unreadable pager messages" option.
Many modern wireless devices, such as weather stations, security sensors, tire pressure sensors, car keys, etc., use radio frequencies to communicate. These devices are normally found in 433-435MHz, 902-928MHz, and some other bands. In order to monitor smart device transmissions in OpenWebRX+, do the following:
Look around ISM frequencies for signals that may be produced by wireless devices.
Once you see any suspicious signals, tune near them and select the "ISM" digital mode. The ISM decoder will monitor and display a wide swath of spectrum around your tuned frequency.
Wait until the signals reappear. If the ISM decoder is able to understand them, the decoded data will appear in a separate panel on top of the waterfall display.
If you are unable to decode any ISM signals or do not see any on the waterfall, try testing the decoder with your wireless car keys. It is important to know their signalling frequency though.
Most voice communications between pilots and air traffic controllers occur in the specially designated 108-137MHz VHF "air band". Somewhat unusual for VHF bands, aircraft use AM modulation to let multiple signals be heard at once at the same frequency. On the shortwave bands, you will find aeronautic weather reports (VOLMET) and some pilot chatter using USB modulation.
In addition to analog voice communications, aircraft and air traffic control services use several digital radio protocols for location reporting, telemetry, messaging, and traffic management. With sufficient hardware, OpenWebRX+ can receive multiple aeronautic protocols at multiple frequencies at once, maintaining a common database of all received aircraft data and presenting it on the map.
Aircraft are identified with several different IDs, including flight ID, aircraft tail number, and ICAO code (aka Mode-S transponder code). OpenWebRX+ will hyperlink received IDs to the FlightAware website, where you can find flight paths, photos, and other facts about each flight.
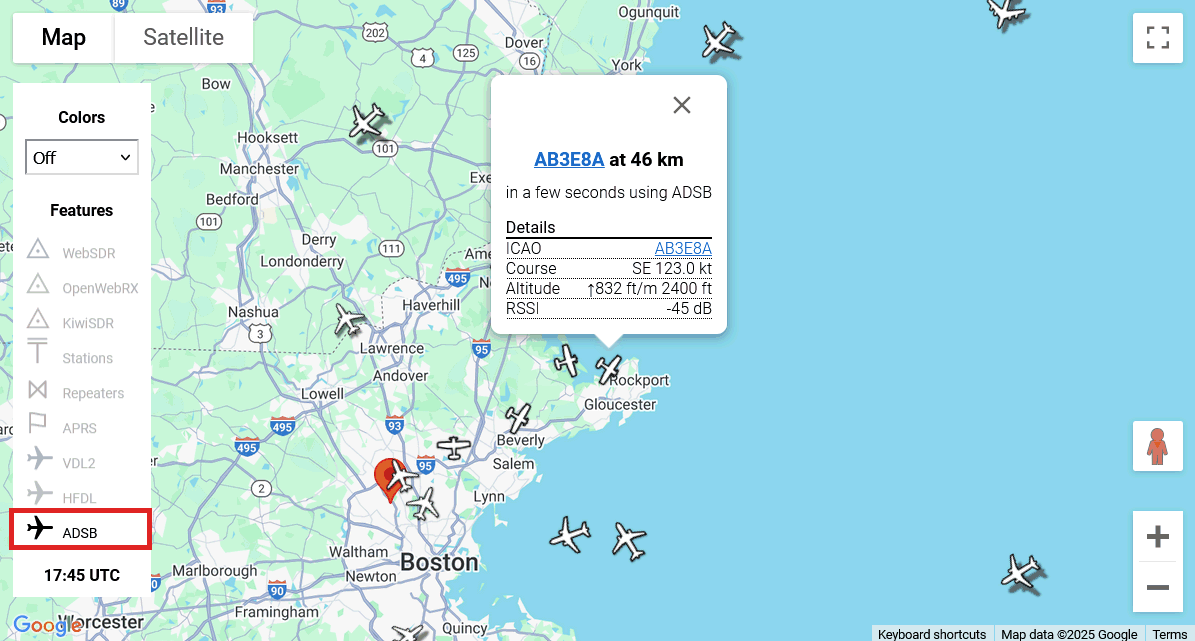
Airplanes periodically report their locations using the Automatic Dependent Surveillance Broadcast (ADS-B) system, at 1090MHz and 978MHz frequencies. OpenWebRX+ can listen to these frequencies and display received flight information to you.
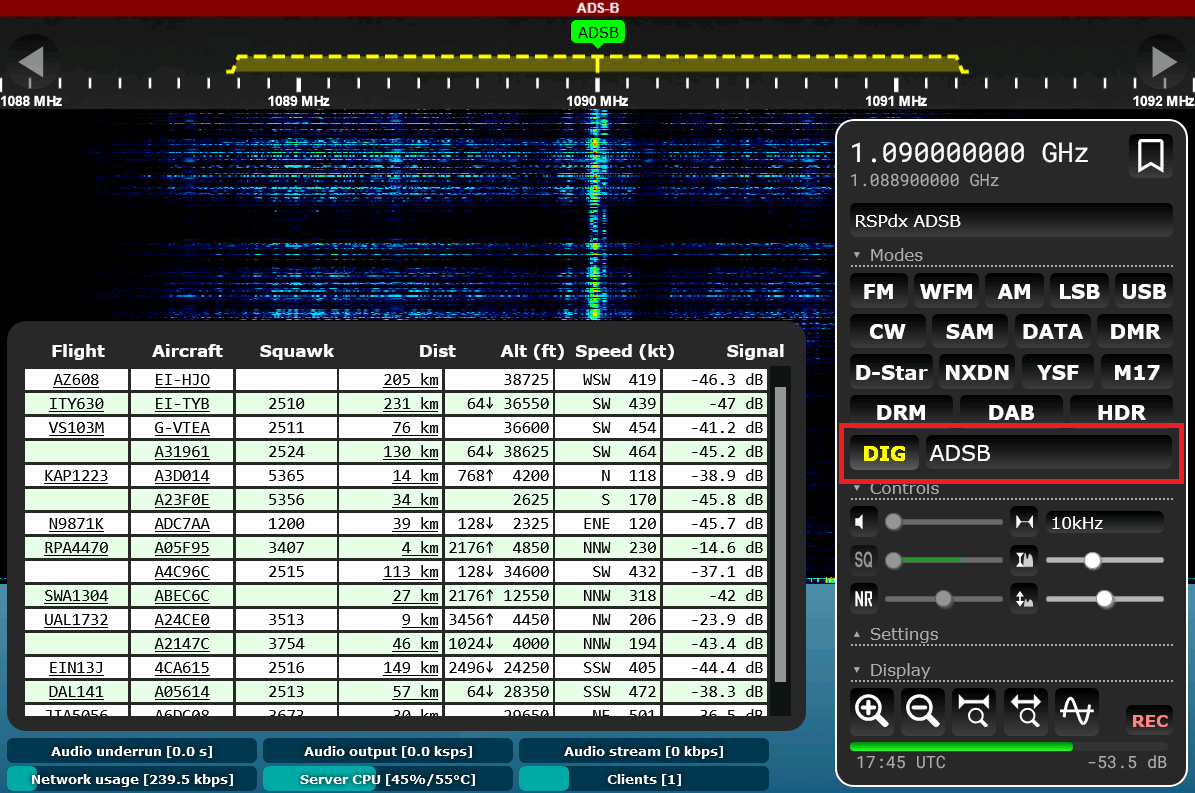
To receive ADS-B transmissions, select a profile containing one of the ADS-B frequencies. Since these transmissions require 2.4MHz of bandwidth, the profile must have at least 1.2MHz of bandwidth at each side of an ADS-B frequency.
Standard ADS-B frequencies are part of the OpenWebRX+ band plan and thus marked with green bookmarks. Once you click on an ADS-B bookmark, a panel will appear showing the reported aircraft with their flight data.
If you click on the Map button, you should see aircraft locations on the map. Clicking on an airplane pops up a bubble showing some basic information about that airplane.
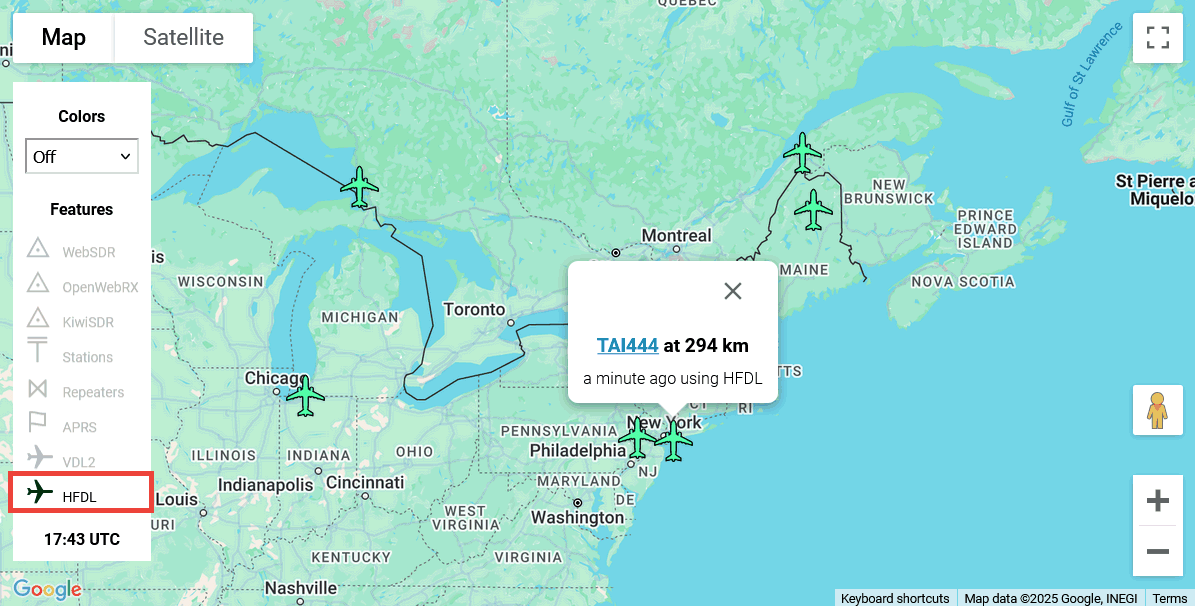
The HF Data Link (HFDL) is a long-distance shortwave messaging system used to manage aircraft traffic around the globe. The system consists of around 15 ground stations (GS) covering the entire globe. HFDL messages may contain aircraft locations, telemetry, and text communications between ground stations and the aircraft.
All HFDL ground station frequencies are marked with yellow bookmarks in OpenWebRX+. Simply click on a bookmark to start receiving HFDL messages, or tune manually and select the "HFDL" digital mode.
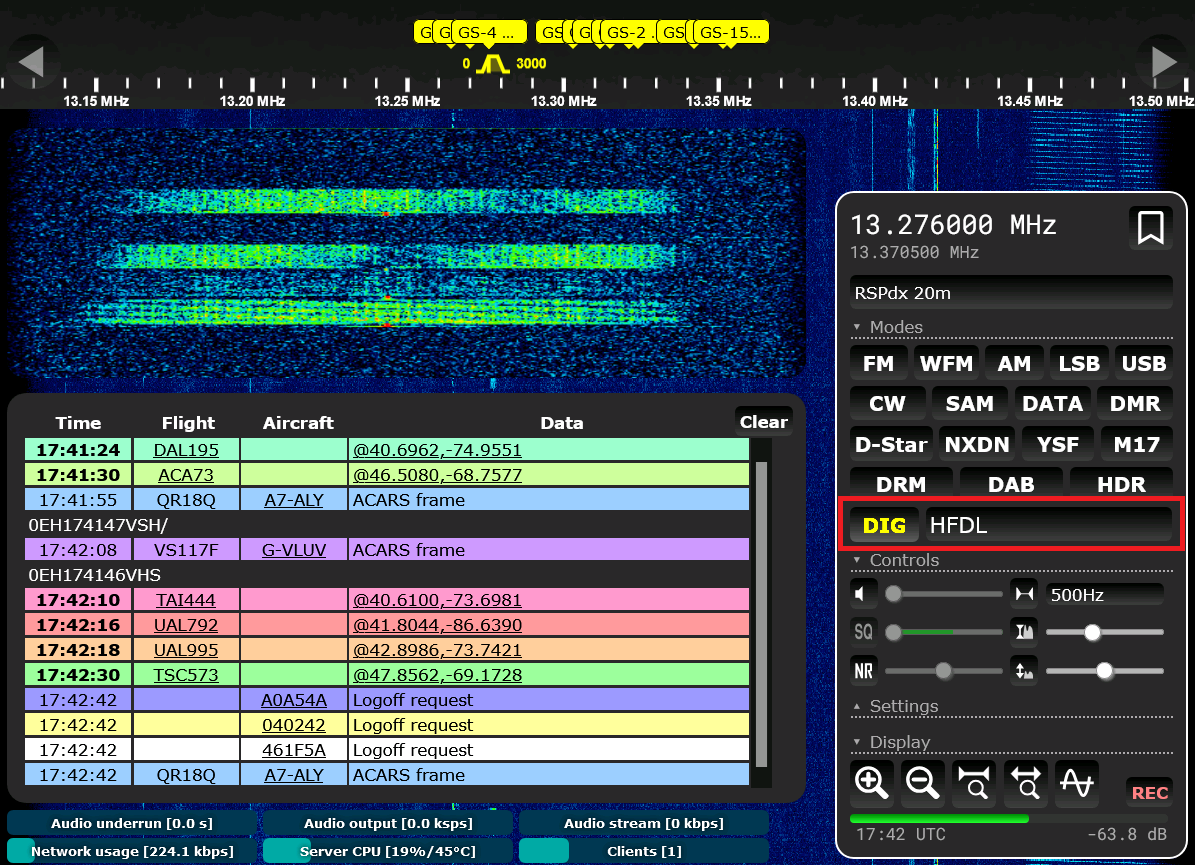
Keep in mind that you will not be able to hear all the ground stations from a single location: that is why there are multiple stations all around the globe. Also, each ground station has its own broadcasting schedule and thus may be silent at the present time.
If you click on the Map button, you should see HFDL-reported aircraft locations as little green airplanes on the map. Clicking on an airplane pops up a bubble showing some basic information about that airplane. Since HFDL does not report aircraft altitude or direction, most airplanes will be pointing north. If OpenWebRX+ receives more than one HFDL position report though, it will orient airplane based on the difference between the last two reports.
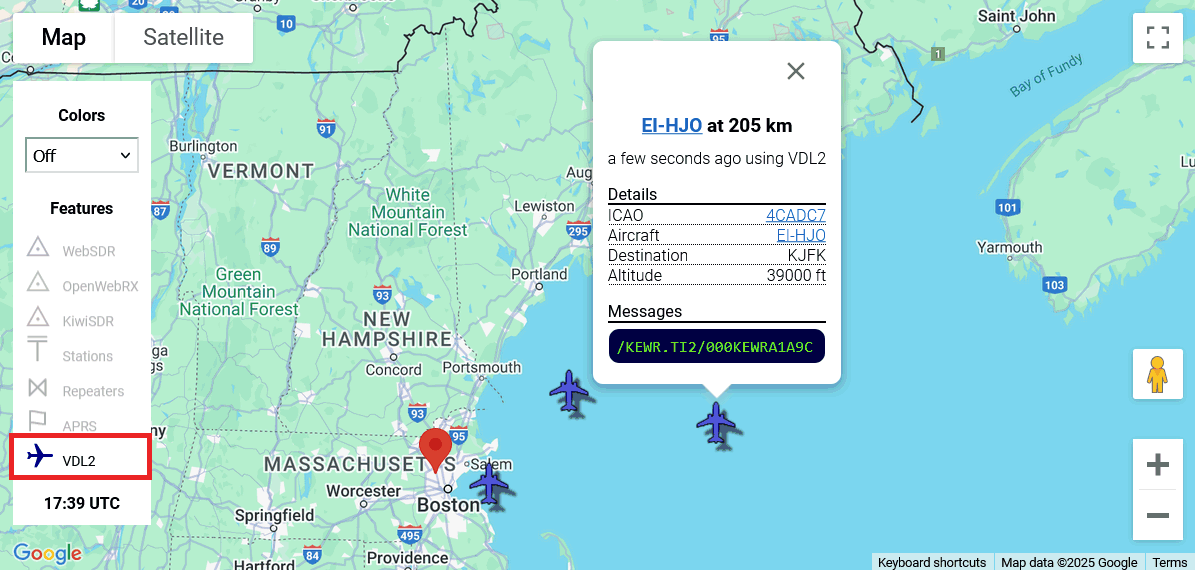
The VHF Data Link Mode 2 (VDL2) is an air band (VHF) messaging system aircraft use to communicate with the air traffic control within their line of sight. VDL2 messages may contain aircraft locations, telemetry, and text communications between aircraft and local ground control.
VDL2 frequencies are found at the end of the air band (108-137MHz) and marked with yellow bookmarks in OpenWebRX+. These bookmarks are commonly labelled with "ARINC" or "SITA", depending on the company that manages each frequency. Simply click on a bookmark to start receiving VDL2 messages, or tune manually and select the "VDL2" digital mode.
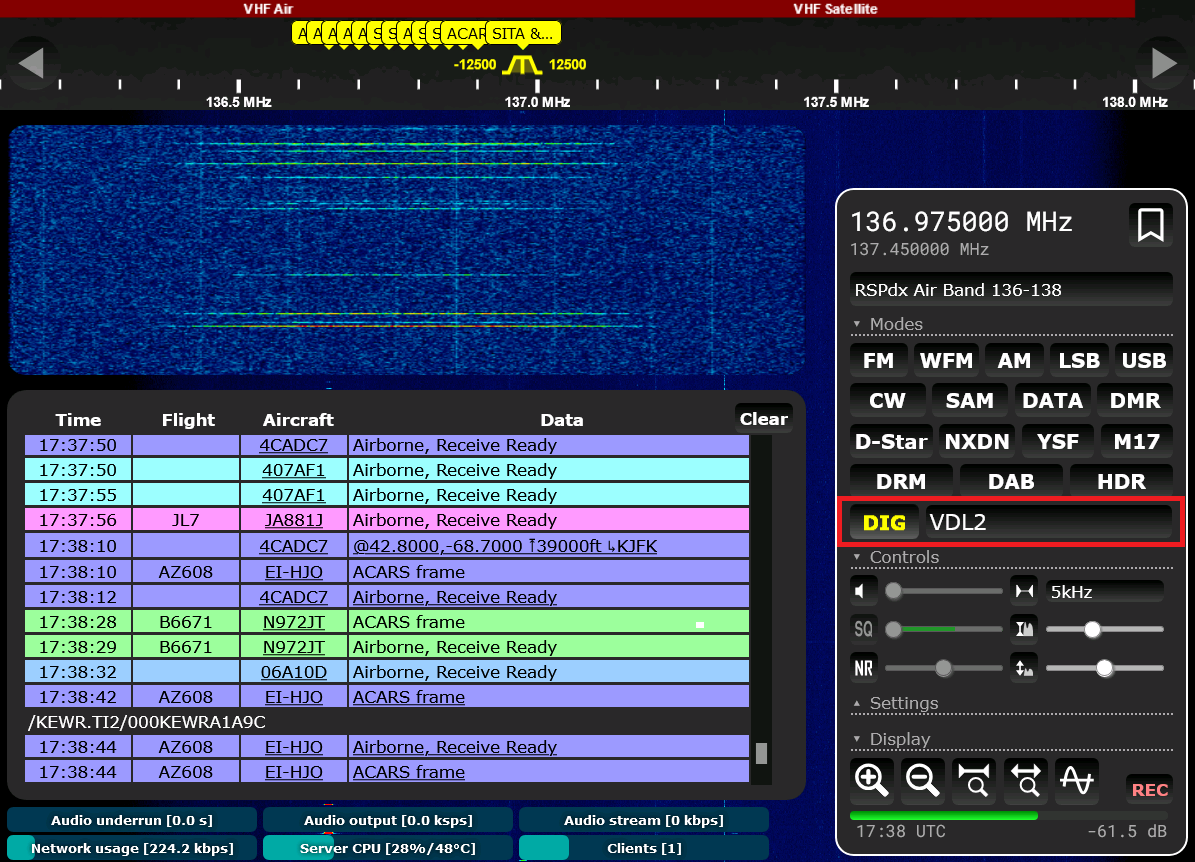
Keep in mind that not all VDL2 frequencies will appear live from your receiver location: some of them are only used in certain parts of the world.
If you click on the Map button, you should see VDL2-reported aircraft locations as little blue airplanes on the map. Clicking on an airplane pops up a bubble showing some basic information about that airplane, including text message history. Since VDL2 does not report aircraft direction, most airplanes will be pointing north. If OpenWebRX+ receives more than one VDL2 position report though, it will orient airplane based on the difference between last two reports.
The Aircraft Communications Addressing and Reporting System (ACARS) is the original aircraft communications protocol, now mostly replaced with VDL2. Similarly to VDL2, ACARS uses the air band to carry telemetry and text messages between aircraft and local air traffic control. Unlike VDL2, ACARS messages rarely contain aircraft locations.
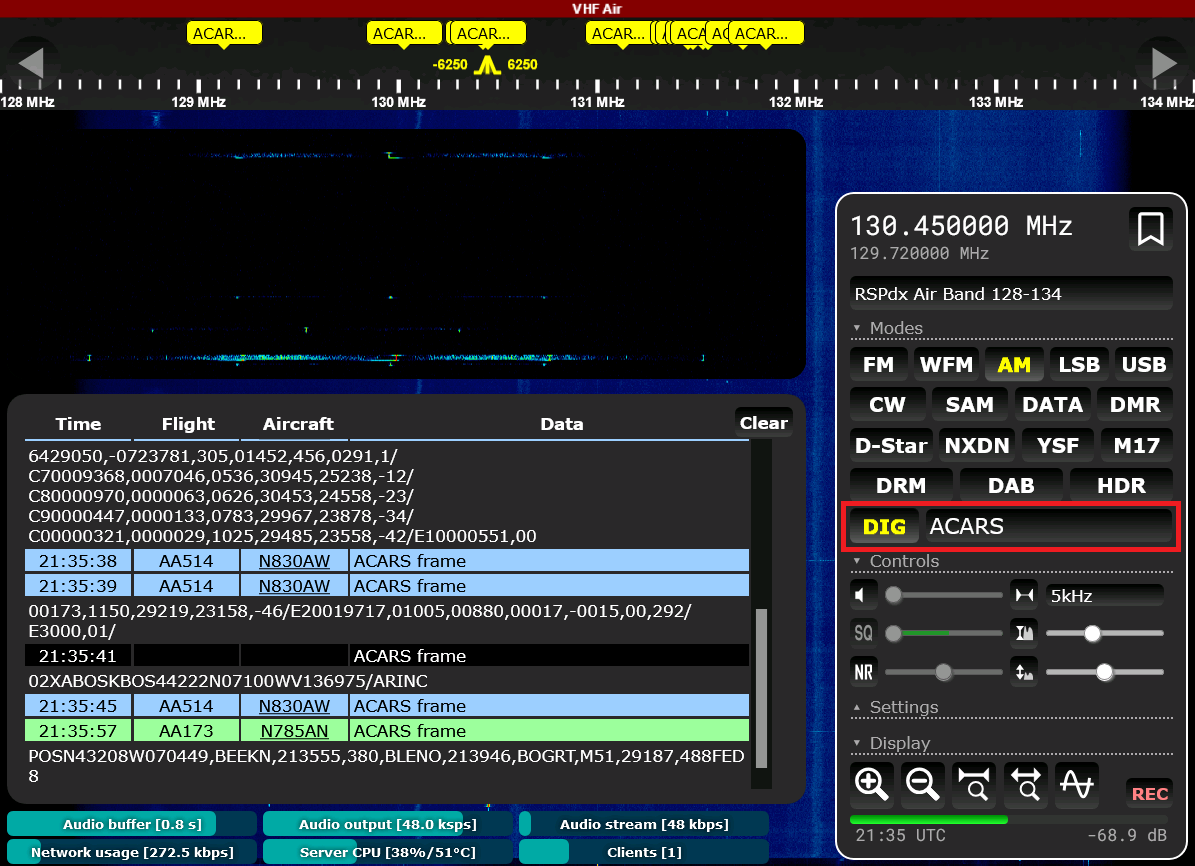
ACARS frequencies are found at the end of the air band (108-137MHz) and marked with yellow bookmarks in OpenWebRX+. Simply click on a bookmark to start receiving ACARS messages, or tune manually and select the "ACARS" digital mode.
Keep in mind that not all ACARS frequencies will appear live from your receiver location: some of them are only used in certain parts of the world, others replaced with VDL2.
If you click on the Map button, you might see some ACARS-reported aircraft locations as little red airplanes on the map. Clicking on an airplane pops up a bubble showing some basic information about that airplane, including text message history. Since ACARS does not report aircraft direction, most airplanes will be pointing north. If OpenWebRX+ receives more than one ACARS position report though, it will orient airplane based on the difference between last two reports.
Vessels at sea use shortwave bands and USB modulation for voice communications over long distances. Short range voice calls between ships and the shore occur in the 156-174MHz VHF "marine band". In addition to analog voice, the marine band contains AIS location reporting, paging, and other digital services.
A lot of digital maritime communications fall under the Global Maritime Distress and Safety System (GMDSS), which includes marine safety information (MSI), navigational telex (NAVTEX), and digital selective calling (DSC). Marine weather maps are available via weather fax transmissions from coastal stations.
Modern vessels report their locations using a VHF radio system known as Automatic Identification System (AIS). If your OpenWebRX+ receiver is located near a large enough body of water, it may be able to receive AIS position reports and display them on the map.
AIS operates at two marine band frequencies, 161.975MHz and 162.025MHz. Once you select a profile containing these frequencies, you will see them marked with green bookmarks, since they are part of the band plan. Click on an "AIS" bookmark and a secondary waterfall should appear, together with the information panel showing received position reports.
Now, if you click on the Map button, you should see ship locations on the map. Clicking on a ship pops up a bubble showing some basic information about that ship.
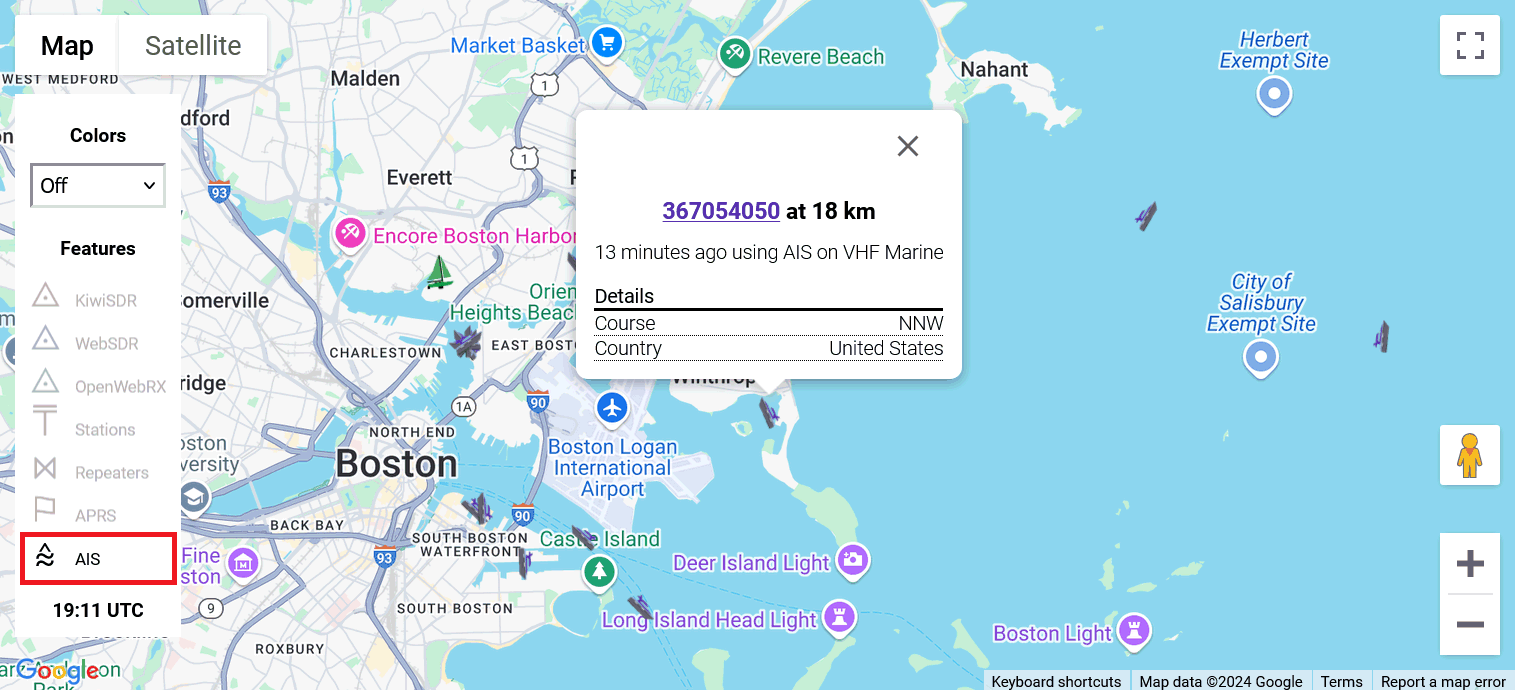
AIS identifies every vessel with a unique number known as MMSI. OpenWebRX+ shows these MMSI numbers, hyperlinking them to the Vessel Finder website, where you can find photos and other facts about each vessel.
The Maritime Safety Information (MSI) messages are distributed on shortwave bands using SITOR-B protocol. The SITOR-B is somewhat similar to RTTY, but adds redundancy and error checking.
Standard MSI frequencies are marked with yellow "MSI" bookmarks in OpenWebRX+. Simply click on a bookmark to start receiving MSI messages, or tune manually and select the "SITOR-B" digital mode.
Similar to MSI, Navigational Telex (NAVTEX) uses SITOR-B protocol. Coastal stations send regular NAVTEX bulletins at prearranged shortwave frequencies. Each NAVTEX bulletin starts with a four-letter code specifying its origin, subject, and sequential number.
Standard NAVTEX frequencies are part of the OpenWebRX+ band plan and thus marked with green "NAVTEX" bookmarks. Simply click on a bookmark to start receiving NAVTEX messages, or tune manually and select the "NAVTEX" digital mode. Same NAVTEX transmissions can be received by selecting the "SITOR-B" digital mode, but OpenWebRX+ will not be able to check for the four-letter bulletin identifiers when using plain SITOR-B.
Digital Selective Calling (DSC) uses predefined digital messages to report emergencies and other special events, as well as announce voice call frequencies. DSC operates in shortwave and marine (VHF) bands, but OpenWebRX+ is only able to decode shortwave DSC modes at the moment. In addition to sender's and receiver's MMSIs, DSC messages may also carry their positions. For emergencies, the nature and location of emergency are reported.
Standard DSC frequencies are marked with yellow bookmarks in OpenWebRX+. Simply click on a bookmark to start receiving DSC messages, or tune manually and select the "DSC" digital mode.

This section provides step by step instructions for installing OpenWebRX+. There are prebuilt OpenWebRX+ packages for Ubuntu 22.04, Ubuntu 24.04, Debian Bullseye, Debian Bookworm, and Debian Trixie. There are also pre-built SD card images for Raspberry Pi users, as well as Docker images. If you are running a different version of Linux and have sufficient experience, you can try compiling OpenWebRX+ from sources. Windows users can try installing OpenWebRX+ within Windows WSL2 environment.
Start by adding the OpenWebRX+ repository, as well as the original OpenWebRX repository. You will be asked to enter your Linux user password:
curl -s https://luarvique.github.io/ppa/openwebrx-plus.gpg | sudo gpg --yes --dearmor -o /etc/apt/trusted.gpg.d/openwebrx-plus.gpg
sudo tee /etc/apt/sources.list.d/openwebrx-plus.list <<<"deb [signed-by=/etc/apt/trusted.gpg.d/openwebrx-plus.gpg] https://luarvique.github.io/ppa/ubuntu ./"
curl -s https://repo.openwebrx.de/debian/key.gpg.txt | sudo gpg --yes --dearmor -o /usr/share/keyrings/openwebrx.gpg
sudo tee /etc/apt/sources.list.d/openwebrx.list <<<"deb [signed-by=/usr/share/keyrings/openwebrx.gpg] https://repo.openwebrx.de/ubuntu/ jammy main"
Once the repositories are added, install OpenWebRX+ from packages.
Start by adding the OpenWebRX+ repository, entering your Linux user password when asked:
curl -s https://luarvique.github.io/ppa/openwebrx-plus.gpg | sudo gpg --yes --dearmor -o /etc/apt/trusted.gpg.d/openwebrx-plus.gpg
sudo tee /etc/apt/sources.list.d/openwebrx-plus.list <<<"deb [signed-by=/etc/apt/trusted.gpg.d/openwebrx-plus.gpg] https://luarvique.github.io/ppa/noble ./"
Once the repository is added, install OpenWebRX+ from packages.
Start by adding the OpenWebRX+ repository, as well as the original OpenWebRX repository. You will be asked to enter your Linux user password:
curl -s https://luarvique.github.io/ppa/openwebrx-plus.gpg | sudo gpg --dearmor -o /etc/apt/trusted.gpg.d/openwebrx-plus.gpg
sudo tee /etc/apt/sources.list.d/openwebrx-plus.list <<<"deb [signed-by=/etc/apt/trusted.gpg.d/openwebrx-plus.gpg] https://luarvique.github.io/ppa/debian ./"
curl -s https://repo.openwebrx.de/debian/key.gpg.txt | sudo gpg --yes --dearmor -o /usr/share/keyrings/openwebrx.gpg
sudo tee /etc/apt/sources.list.d/openwebrx.list <<<"deb [signed-by=/usr/share/keyrings/openwebrx.gpg] https://repo.openwebrx.de/debian/ bullseye main"
Once the repositories are added, install OpenWebRX+ from packages.
Start by adding the OpenWebRX+ repository, entering your Linux user password when asked:
curl -s https://luarvique.github.io/ppa/openwebrx-plus.gpg | sudo gpg --yes --dearmor -o /etc/apt/trusted.gpg.d/openwebrx-plus.gpg
sudo tee /etc/apt/sources.list.d/openwebrx-plus.list <<<"deb [signed-by=/etc/apt/trusted.gpg.d/openwebrx-plus.gpg] https://luarvique.github.io/ppa/bookworm ./"
Once the repository is added, install OpenWebRX+ from packages.
Start by adding the OpenWebRX+ repository, entering your Linux user password when asked:
curl -s https://luarvique.github.io/ppa/openwebrx-plus.gpg | sudo gpg --yes --dearmor -o /etc/apt/trusted.gpg.d/openwebrx-plus.gpg
sudo tee /etc/apt/sources.list.d/openwebrx-plus.list <<<"deb [signed-by=/etc/apt/trusted.gpg.d/openwebrx-plus.gpg] https://luarvique.github.io/ppa/trixie ./"
Once the repository is added, install OpenWebRX+ from packages.
Once you have all required package repositories added, install OpenWebRX+ as follows:
sudo apt update
sudo apt install openwebrx
If you already have an older version of OpenWebRX installed, do this instead:
sudo apt update
sudo apt upgrade
To make sure OpenWebRX+ is running, direct your local web browser to the following address and see if OpenWebRX+ web interface shows up there:
http://localhost:8073/
If you have a Raspberry Pi, you can use pre-built SD card images containing a clean OpenWebRX+ installation with all the optional packages. The 32bit image should run on all devices except for RPI1 and RPI5. The 64bit image should run on all devices except for RPI1, RPI2, and RPIZero1. Both images support common SDR device models out of the box. For example, both RTL-SDR and SDRPlay devices have been confirmed to work with no additional modifications to the images.
To flash image to an SD card, run Raspberry Pi Imager and select "USE CUSTOM" option from the "Operating System | CHOOSE OS" menu. Prior to flashing SD card, you can tell RPI Imager to set up the root password. If you skip this step, you will be asked to create root password on the first startup.
After booting the image, you will have to SSH into the device using your username and password from the installation. Follow the instructions on the console to create your admin account for OpenWebRX+. Use the admin account to log in to the OpenWebRX+ Settings interface and setup your receiver.
Please note that these images come without the software support for digital modes (DMR, NXDN, etc), since the software decoder for these modes (mbelib) has questionable origins. In order to enable digital modes in these images, ssh into the user account you created while installing the image and type:
sudo install-softmbe.sh
Please, do not attempt building OpenWebRX+ from sources, unless you know exactly what you are doing! If you feel confident enough though, and have a Debian-like Linux, start by cloning OpenWebRX+ repository and running the "buildall.sh" script as follows:
git clone https://github.com/luarvique/openwebrx.git
cd openwebrx
./buildall.sh
The script will attempt to fetch and build all OpenWebRX+ dependencies prior to building OpenWebRX+ itself. It will also build a bunch of optional packages. The build process uses the "owrx-build" folder to store intermediate files. The final .deb packages will be deposited into the "owrx-output" folder.
If the build breaks, it is up to you to find and fix the cause. It is expected that you know how to find and rectify build issues. Once the build successfully finishes, you can install the freshly built packages as follows:
sudo dpkg -i ./owrx-output/*.deb
OpenWebRX+ can run under Windows using WSL2 and USB-IP. USB-IP is needed to pass the SDR device from Windows to WSL2. First, install WSL2 by running PowerShell as Administrator and typing:
wsl --install
After the installation is complete, restart your computer. Start PowerShell again, set WSL2 as your default version, then find Ubuntu 24.04 distribution and install it by typing:
wsl --set-default-version 2
wsl --list --online
wsl --install -d Ubuntu-24.04
Next time you need to start WSL2, just type "wsl" in PowerShell. Now, open another PowerShell window and install USB-IP by typing:
winget install --source winget --id dorssel.usbipd-win
Find the BUSID of your SDR device by typing:
usbipd list
Bind and attach your SDR device to WSL2 by typing the following lines and replacing <BUSID> with the actual BUSID of your SDR device. You will need to have WSL2 running in the other PowerShell for these commands to work:
usbipd bind --busid <BUSID>
usbipd attach --busid <BUSID>
If everything goes fine, you should see your SDR device inside WSL2 by typing:
sudo apt install usbutils
lsusb
Now follow the instructions for Ubuntu 24.04 to install OpenWebRX+ inside WSL2. You can also install Docker Desktop and use the OpenWebRX+ Docker images in WSL2.
Note: To use Docker images in Windows, follow the instructions for Windows WSL2 first.
Pre-built Docker images contain clean OpenWebRX+ installation with all the optional packages. There are two Docker images, both supporting x86-64, ARM64, and ARM32 architectures, one with SoftMBE and another without SoftMBE. The easiest way to use OpenWebRX+ Docker image is through Docker Compose, as shown below:
Install Docker and Docker Compose. The exact procedure depends on your Linux distribution. You will need to research that by yourself.
Create folders to store your persistent data (settings, profiles, plugins, etc.). Here, we will use "/opt/owrx-docker" as the base folder to store all our data, but you can also use a different folder:
sudo mkdir -p /opt/owrx-docker/var /opt/owrx-docker/etc /opt/owrx-docker/plugins/{receiver,map}
Create "docker-compose.yaml" file as shown below. You can save this file to the "/opt/owrx-docker" folder and modify it to your needs. Configure TZ, ADMIN_USER, and ADMIN_PASS variables, using canonical identifier for TZ. If you are using data folder different from "/opt/owrx-docker", modify your "docker-compose.yaml" file to reflect that. Keep in mind that YAML files are indented with spaces, and the spaces in front of each line are important.
services:
  owrx:
    image: 'slechev/openwebrxplus-softmbe:latest'
    container_name: owrx-mbe
    restart: unless-stopped
    ports:
      - '8073:8073'
    environment:
      TZ: Europe/Sofia
      OPENWEBRX_ADMIN_USER: myuser
      OPENWEBRX_ADMIN_PASSWORD: password
    devices:
      - /dev/bus/usb:/dev/bus/usb
    volumes:
      - /opt/owrx-docker/etc:/etc/openwebrx
      - /opt/owrx-docker/var:/var/lib/openwebrx
      - /opt/owrx-docker/plugins:/usr/lib/python3/dist-packages/htdocs/plugins
    # mount /tmp in memory, for RPi devices, to avoid SD card wear and make dump1090 work faster
    tmpfs:
      - /tmp:mode=1777
Start the container as follows:
cd /opt/owrx-docker && sudo docker compose up -dTo update your container to the latest released image, use:
cd /opt/owrx-docker && sudo docker compose pull && sudo docker compose down && docker compose up -d
More information about environment variables within the image and how to use docker-cli method can be found at the Docker Hub Page.
IMPORTANT: If you are using SDRPlay devices with Docker, restart the container every time you reboot the host or reconnect a device. Docker will not present a "new" SDRPlay device to the container unless that container is restarted.
OpenWebRX supports multiple SDR receiver devices at the same time. The total number is mainly limited by your computer performance. In this section, we are going to discuss the most common SDR devices, their capabilities, and how to set them up with OpenWebRX. Here is a short comparison of the most common SDR devices:
| Device | Range | Bandwidth | Resolution | Interface |
|---|---|---|---|---|
| RTLSDRv3 | 500kHz-14MHz, 24MHz-1766MHz | 2.4Msps | 8bit | USB |
| RTLSDRv4 | 500kHz-1766MHz | 2.4Msps | 8bit | USB |
| SDRPlay | 1kHz-2000MHz | ≤ 10Msps | ≤ 14bit | USB |
| Airspy R2 | 24MHz-1700MHz | 10Msps | 12bit | USB |
| Airspy HF+ | 500Hz-31MHz, 64MHz-260MHz | 768ksps | 18bit | USB |
| Hermes Lite 2 | 130kHz-30MHz | 4 x 384ksps | 12bit | Ethernet |
| HackRF One | 1MHz-6GHz | 20Msps | 8bit | USB |
See below for instructions on making these SDR devices work with OpenWebRX.
RTL-SDR is a large family of USB-connected SDR receivers based on the Realtek RTL2832U chipset. Under regular circumstances, these devices allow reception in the 24MHz-1766MHz range. They can also be persuaded to work in the 500kHz-14MHz range, although the reception quality is not very good there.
The most common RTL-SDR device is RTLSDRv3 from RTL-SDR Blog. In a lot of cases, the driver for this device is already installed in your Linux system. If it is not, you can install it with the following command:
sudo apt install rtl-sdr librtlsdr0 librtlsdr-dev
A somewhat better RTL-SDR version is RTLSDRv4 from RTL-SDR Blog. This device officially supports the 500kHz-24MHz frequency range via the built-in transverter. It may require updated RTL-SDR drivers though. If your current drivers do not support RTLSDRv4, you may have to build and install the new drivers as follows:
sudo apt install libusb-1.0-0-dev git cmake build-essential pkg-config debhelper
git clone https://github.com/rtlsdrblog/rtl-sdr-blog
cd rtl-sdr-blog
sudo dpkg-buildpackage -b --no-sign
cd ..
sudo dpkg -i librtlsdr0_*.deb librtlsdr-dev_*.deb rtl-sdr_*.deb
With RTLSDRv4 devices, you do not need to do anything special in order to use the 500kHz-24MHz frequency range. These frequencies will work out of the box, as long as you are using the correct device driver.
With RTLSDRv3 and similar devices, you will have to add the "Direct Sampling" option to each shortwave profile and set its value to "Direct Sampling (Q branch)". With this option enabled, most RTL-SDR devices will be able to receive in the 500kHz-14MHz range. The 14MHz-24MHz range will remain unusable.
Please, note that the default RTLSDR device entry in OpenWebRX has been created for RTLSDRv3, so all profiles under that entry have the "Direct Sampling" option enabled. If you happen to have RTLSDRv4, make sure to remove the direct sampling option from every RTLSDR profile. Otherwise, these profiles will not work.
When using multiple RTL-SDR devices with OpenWebRX, you will have to assign each of them a unique serial number with the following shell command:
rtl_eeprom -d <device-index> -s <serial-number>Once assigned, the serial number will be persistently stored within each device. To make OpenWebRX distinguish between your devices, add the "Device Identifier" option to each device and set it to device's unique serial number.
To see indices and serial numbers of your RTL-SDR devices, run the same command without arguments:
rtl_eeprom
RSP is a family of USB-connected SDR receivers based on the Mirics MSI001 / MSI2500 chipset. The official RSP devices are made and sold by SDRPlay, but since the basic schematics are standard, there are many inferior, but cheaper Chinese RSP clones on the market. These devices are capable of continuous reception in the 0-2GHz range, with bandwidth of up to 6Msps. This bandwidth can be further widened to 10Msps at the cost of losing some bit resolution.
To make an RSP device work with OpenWebRX+, you will first have to download and install the latest SDRPlay API for your version of Linux from the SDRPlay website. Your RSP device will not work unless you install the SDRPlay API.
Once you have SDRPlay API installed, install the SoapySDRPlay3 package from OpenWebRX+ repositories as follows:
sudo apt install soapysdr-module-sdrplay3During installation, the SoapySDRPlay3 package will also install the latest SoapySDR and remove all locally built SoapySDR files from /usr/local to prevent conflicts between packaged and locally built versions of SoapySDR.
You may encounter a situation where installed SDRPlay API breaks down on your Linux system due to incompatible system libraries. If you look at the SDRPlay service logs:
journalctl -u sdrplayand see the following messages:
/opt/sdrplay_api/sdrplay_apiService:
/lib/arm-linux-gnueabihf/libc.so.6: version `GLIBC_2.34' not found
(required by /opt/sdrplay_api/sdrplay_apiService)
then the only way to fix it is to downgrade to an older version of the SDRPlay API. Install SDRPlay API v3.07 from the SDRPlay website, then downgrade SoapySDRPlay3 to a compatible version and prevent it from further upgrades:
sudo apt install soapysdr-module-sdrplay3=0.8.6
sudo apt-mark hold soapysdr-module-sdrplay3
Each genuine RSP device has a unique serial number assigned at the factory. You can see these serial numbers with the following command:
sudo SoapySDRUtil --probe="driver=sdrplay"To make OpenWebRX distinguish between your devices, add the "Device Identifier" option to each device and set it to device's unique serial number.
The Chinese-made RSP clones all come with the same serial number and thus only one Chinese RSP clone can be used with the SDRPlay API. A workaround to this problem is to downgrade SDRPlay API to v3.07 and install the corresponding SoapySDRPlay3 package version, since older SDRPlay API uses USB port numbers as serial numbers. Install SDRPlay API v3.07 from the SDRPlay website, then downgrade SoapySDRPlay3 to a compatible version and prevent it from further upgrades:
sudo apt install soapysdr-module-sdrplay3=0.8.6
sudo apt-mark hold soapysdr-module-sdrplay3
Airspy is a family of USB-connected SDR receivers based on the Realtek R820T2 chipset. These devices are made and sold by Airspy.
Most Linux distributions will have Airspy R2 and Airspy Mini drivers installed by default. If this is not the case, you can install the drivers as follows:
sudo apt install soapysdr-module-airspy
The Airspy HF+ does not have a packaged driver yet, so you will need to compile it as follows:
sudo apt install libusb-1.0-0-dev git cmake build-essential pkg-config debhelper libairspyhf-dev
git clone https://github.com/pothosware/SoapyAirspyHF.git
cd SoapyAirspyHF
sed -i 's/soapysdr0.7-module/soapysdr0.8-module/' debian/control
mv debian/soapysdr0.{7,8}-module-airspyhf.install
sudo dpkg-buildpackage -b --no-sign
cd ..
dpkg -i soapysdr0.8-module-airspyhf_*.deb soapysdr-module-airspyhf_*.deb
Hermes Lite 2 (HL2) is a hobbyist-designed SDR transceiver based on high performance ADC and FPGA chips. Transmit capability aside, HL2 can receive up to four independent chunks of spectrum in the 0-30MHz range, with each chunk limited to the 384kHz width. This makes HL2 ideal for monitoring multiple shortwave bands at the same time.
To make HL2 work with OpenWebRX+, you will have to connect HL2 to your OpenWebRX+ computer with an Ethernet cable. Once HL2 is connected and powered up, it will eventually assign itself the "local" IP address of 169.254.19.221. You then need to install the HPSDR Connector package from OpenWebRX+ repositories, as follows:
sudo apt install hpsdrconnectorOnce installed, you should be able to add new HPSDR devices in the OpenWebRX+ settings. When adding an HPSDR device, make sure you add the "Remote IP" option and set it to the default HL2 IP address of 169.254.19.221.
As has been said before, your HL2 can receive up to four distinct chunks of the shortwave spectrum, representing each chunk with a separate virtual "device". To make use of this capability though, you will have to add four separate HPSDR devices to OpenWebRX+. Point all four devices to the same IP address. Make sure all HPSDR devices use the same sampling rate, as HL2 runs all its RX channels at the same rate.
HackRF One is an open source, USB-connected SDR. In most cases, HackRF One drivers should already be present in your system. If this is not the case, install the drivers as follows:
sudo apt install soapysdr-module-hackrf
It is recommended to connect antenna via a shielded cable in order to keep it away from the receiver and other interference sources. Possible interference sources include power supplies, phone chargers, LED lights, refrigerators, air conditioners, water pumps, and other devices. Power lines inside your home may carry this interference all over the place. Also, powerline network adapters are especially bad sources of electric noise, so avoid using them.
Your antenna choice will always depend on the frequencies you would like to receive and the amount of radio interference at your location. In this section, we will go over some available options.
A telescopic antenna is going to be resonant (most sensitive) to wavelengths that are twice the antenna length. Their limited length makes telescopic antennas the best at FM, VHF, and UHF bands. These antennas can be used for shortwave (<30MHz) reception, but are not very good there.
All telescopic antennas work the same, with longer antennas being more sensitive at lower frequencies. More expensive telescopic antennas are made of sturdier materials and offer better articulation, but not better reception. CB telescopic antennas are a special case, since they contain circuitry biasing them in favor of the CB band.
Grounding the receiver will improve antenna performance. Also, a telescopic dipole ("TV whiskers") will have better performance than a single whip, since it has bigger total length and does not require grounding.
The optimal length of an antenna should be close to 1/2 of the wavelength you expect to receive. For example, if you are planning to listen to the 25m shortwave band, the optimal antenna length will be 25 / 2 ≈ 12.5 meters, which makes shortwave telescopic antennas rather difficult to implement. It is still possible though to attach a really long wire to the antenna connector, throwing it outside or wrapping it around a room as necessary.
Grounding the receiver will improve antenna performance. Also, a dipole made of two pieces of wire will have better performance than a single wire, since it has bigger total length and does not require grounding.
At shorter wavelengths (80MHz+), it is possible to use short rubber whip antennas made for the use in walkie talkies, first responder radios, and scanners. These antennas are small, very portable, and offer decent reception in the FM, VHF, and UHF bands. It is necessary to say though that these antennas are specifically tuned for the VHF and UHF bands and thus become useless in the LW, MW, and SW bands.
As said before, the electromagnetic interference is often a huge problem when listening to the radio indoors or in urban environment. The magnetic loop antennas attempt to work around this interference by receiving the magnetic component of the wave rather than the noisier electric component.
A typical non-resonant loop antenna consists of one or more relatively small (≈1m in diameter) loops of wire connected to a receiver via a tiny transformer ("balun" or "unun"). The total surface of the wire loop determines how much magnetic flux it receives, making bigger loops more sensitive. A loop antenna is directional:
At the wavelengths much longer than the loop size (LW, MW, SW), the maximum gain is achieved when a side of the loop is directed towards the signal source. The loop is not resonant at these frequencies, i.e. it does not favor any specific frequency.
At the wavelengths comparable to the loop size (FM, VHF, UHF), the maximum gain is achieved when the loop surface is directed towards the signal source, same as if it were a dipole. The loop becomes resonant at these frequencies.
While loop antennas are less susceptible to electromagnetic interference, they are also less sensitive to the actual signals. Thus, many commercial loop antennas include low-noise amplifiers (LNAs), requiring a power source. If your loop antenna does not have an LNA, consider adding one. Some commercially available loop antennas are YouLoop, MLA-30+, and GA-450.
A MiniWhip is an active antenna made of a small metal plate ("probe") and a low-noise amplifier (LNA). It measures the electric field strength at the probe, making it a tiny receive-only antenna for a wide range of frequencies.
Being an active antenna, MiniWhip does require a power source. Also, since MiniWhip is essentially a non-resonant electric field probe, it is highly susceptible to interference. Thus, you will need to install it in an area free of electromagnetic noise.
This section discusses administering an OpenWebRX server and how it can be used besides providing public access to radio waves.
As a server administrator, you can make OpenWebRX server automatically decode radio transmissions when someone is listening to a profile with these transmissions. This feature can be used to receive SSTV images, faxes, monitor digital HAM traffic, track airplanes, and so forth.
To start with background decoding, go to "Settings | Background Decoding", check the "Enable background decoding services" option, and select transmission modes you would like to receive and decode automatically. Make sure you only select the ones you really need, since running too many background decoders will slow your server down, a lot.
Now, go to an SDR device you want to use for background decoding, let us say "Settings | SDR Devices and Profiles | <Device>", and add the "Run background services on this device" option. Once you have added this option, make sure it is enabled.
At this point, every time someone connects and listens to a <Device> profile, OpenWebRX will automatically decode all enabled signal types at frequencies marked with green bookmarks, i.e. everything that is part of the band plan. If the decoded data is an image or a message log, these will be saved to the /tmp folder and shown once you click the Files button. Location reports, such as FT8, WSPR, APRS, and others, will show up on the map, when you click the Map button.
In order to enable background decoding at a frequency that is not part of the band plan (no green bookmark), you will have to add that frequency to the band plan by editing the following file:
sudo nano /etc/openwebrx/bands.json
There are also region-specific band plan files in the same folder. If you have selected a region-specific band plan in "Settings | General", edit that band plan instead. Prior to editing a band plan file, make sure you create a backup copy, in case something goes wrong. After editing and saving the file, restart OpenWebRX as follows and make sure there is a green bookmark at the frequency you added:
sudo systemctl restart openwebrx
A typical bands.json frequency entry will look as follows:
"frequencies": {
    "<mode>": <frequency>,
    ...
}
The background decoding in OpenWebRX+ supports the following modes: "ft8", "wspr", "jt65", "jt9", "ft4", "fst4", "fst4w", "q65", "msk144", "js8", "packet", "ais", "sstv", "fax", "navtex", "dsc", "page", "eas", "ism", "hfdl", "vdl2", "acars", "adsb", "audio". If you have multiple frequencies associated with the same mode, enter them as a list:
"frequencies": {
    "<mode>": [ <frequency1>, <frequency2>, ... ],
    ...
}
Finally, if you would like to specify an underlying modulation, such as "lsb", "usb", "am", "nfm", "sam", or "cw", enter it as follows:
"frequencies": {
    "<mode>": { "frequency": <frequency>, "underlying": "<modulation>" },
    ...
}
Here is an example of two FT4 frequencies, using their default USB modulation, and two SSTV frequencies using different modulations:
"frequencies": {
    "ft4": [ 3568000, 3575000 ],
    "sstv": [
        { "frequency": 3730000, "underlying": "lsb" },
        { "frequency": 3845000, "underlying": "usb" }
    ],
    ...
}
Here is another example of an FM-modulated VHF frequency. With the "Settings | Background Decoding | Audio Recorder" option enabled, this entry will make OpenWebRX+ record audio to an MP3 file and let users access it via the file browser page:
"frequencies": {
    "audio": { "frequency": 145700000, "underlying": "nfm" },
    ...
}
In the previous section, we discussed how OpenWebRX can decode radio transmissions automatically, while someone is using it. In this section, we are going to make OpenWebRX run the radio and receive signals on its own, when nobody is using it.
Start with an SDR device where you previously enabled background services by going to "Settings | SDR Devices and Profiles | <Device>". Add the "Scheduler" option to this device and find the newly added scheduler selector among other settings. It is going to offer you two different schedule models:
Daylight Scheduler
The daylight scheduler lets you select three profiles to run on the
device during the day, the night, and the "greyline" period (i.e. dawn
and dusk). Since radio waves propagation depends on the time of a day,
this scheme provides easy to configure, yet functional schedule.
Static Scheduler
The static scheduler lets you define your own schedule of as many
entries as you like, with minute precision. While such a schedule is
more difficult to add, it gives you flexibility to switch through
several different profiles each hour.
Once you have your schedule added and saved, OpenWebRX will switch device between scheduled profiles, as long as nobody is using this device. Once all the users disconnect, OpenWebRX will return the SDR device to its currently scheduled profile. It will also run any applicable background decoders you enabled earlier, reporting received data to the map or saving it to the file storage.
In the two previous sections, we discussed how OpenWebRX can be configured to automatically decode various radio transmissions. In this section, we are going to discuss sending the decoded data to online services, such as APRS-IS, PSKReporter, WSPRnet, or MQTT. To configure online reporting, go to the "Settings | Spotting and Reporting" settings page. There are three sections there, for the three types of data OpenWebRX can report:
APRS-IS
The received APRS position reports can be sent to the
APRS-IS network.
In order to do that, fill in your APRS callsign and the nearest server
address. You may also need to provide APRS-IS network password. Finally,
check the "Send received APRS data to APRS-IS" option. The
reported data will show up at the
APRS.fi map.
Please, note that
APRS.fi
does not show multiply reported spots, so some of your reports may not
show there.
If you would also like to report your receiver position to APRS-IS, check the "Send the receiver position to the APRS-IS network" option and fill in information about your receiver and antenna specifics.
Please, note that only one decoder can send data to the APRS-IS network using the same callsign. Thus, if you have more than one APRS decoder running (for example, at 144.39MHz and 145.825MHz), some of your reports will not make it through. To fix this issue, disable all but one APRS frequency in the band plan file.
PSKReporter
OpenWebRX can report FT8, FT4, JT9, JT65, FST4, JS8, Q65, WSPR, FST4W,
and MSK144 transmissions to the
PSKReporter
website. All you need to do is check the "Enable sending spots to
pskreporter.info" option and fill callsign field with a unique name.
It does not have to be your official HAM callsign, but most
people who have HAM callsigns use them here. The reported data will show
up at the
PSKReporter map.
You may also want to describe your antenna in the antenna information
field, so that other people know how you received the data you are
reporting.
WSPRnet
The
WSPRnet
website only accepts WSPR and FST4W reports. To enable it, check the
"Enable sending spots to wsprnet.org" option and enter your
unique name into the callsign field. It does not have to be your
official HAM callsign, but most people who have HAM callsigns use them
here. The reported data will show up at the
WSPRnet map.
MQTT
The
MQTT
is a protocol for reporting IOT events to multiple remote subscribers.
In order to use MQTT, you will need to have an MQTT broker, such as
Mosquitto.
Once you have a broker, enable MQTT reporting by checking the "Enable
publishing reports to MQTT" option and entering your broker address
into the appropriate field. You may also have to enter your client ID,
username, and password. By default, OpenWebRX+ reports all its events
under the "openwebrx" topic, but that can be changed by entering
your own topic name into the "MQTT topic" field.
OpenWebRX+ offers two map options: Google Maps and a collection of free maps based on the Leaflet library. The very popular OpenStreetMap is part of that collection.
The Google Maps implementation is more detailed and polished, but it may require you to register your credit card with Google to receive an API key. Google may then charge your credit card if you exceed a certain limit of the Google Maps accesses.
The OpenStreetMap and other maps included with the Leaflet are less detailed, but they are totally free. Also, the Leaflet implementation includes some extra layers for weather, maritime annotations, and so forth.
In order to configure the default map, go to "Settings | General | Map | Map Type" and select the map you would like to show to the users by default. Remember that a user can always switch maps by clicking on the Map button. Other map-related options available from the same settings section are:
Google Maps API Key
This is where you enter the Google Maps API key you received from
Google. Leave this field empty if you have no API key. A lot of times,
Google Maps will work anyway, for some reason.
OpenWeatherMap API Key
If you would like to see global weather on Leaflet maps, consider
getting an OpenWeatherMap API key and entering it here. These
keys are free, for limited amount of functionality. Without this key,
OpenWebRX+ will only be able to show you US weather, obtained from
WeatherRadar.
Map Retention Time
This is the time, in seconds, the received location reports stay visible
on the map. A location report will start getting dimmer once it becomes
older than half of the retention time. Once it reaches the retention
time, a location report will disappear from the map.
Callsign Database URL
This is the web site used to look up reported HAM callsigns when you
click them on the map. The "{}" characters will be replaced with
the actual callsign. Two common choices here are
qrz.com and
qrzcq.com.
Vessel Database URL
This is the web site used to look up vessel MMSI numbers when you click
them on the map. The "{}" characters will be replaced with the
actual MMSI number.
Flight Database URL
This is the web site used to look up airline flight IDs when you click
them on the map. The "{}" characters will be replaced with the
actual flight ID.
Aircraft Database URL
This is the web site used to look up aircraft Mode-S IDs when you click
them on the map. The "{}" characters will be replaced with the
actual Mode-S ID.
Once a day, OpenWebRX+ queries the EiBi database for shortwave broadcast schedules. Currently broadcasting stations are indicated with ⍑ markers on the map and with bookmarks in the main receiver window.
You can make OpenWebRX+ create bookmarks for currently broadcasting shortwave stations by setting their maximum range from the receiver via "Settings | General | Display | Shortwave Bookmarks Range". OpenWebRX+ will only create bookmarks for shortwave stations located within that range.
You can also restrict shortwave bookmarks to just a few profiles (such as 49m / 41m / etc):
Disable global shortwave bookmarks by setting "Settings | General | Display | Shortwave Bookmarks Range" to zero.
Go to "Settings | SDR Devices and Profiles | <Device> | <Profile>" and add an option called "Shortwave Bookmarks Range" by clicking on Add.
Set the newly added option to the maximum range from the receiver where you would like to see shortwave bookmarks and save profile settings by clicking on Apply and Save.
It is important to note that the shortwave stations will only show correctly if you set the correct receiver location in "Settings | General | Receiver Information | Receiver Location". It is also important to remember that since OpenWebRX+ queries EiBi once a day, the up-to-date information may not be available immediately after setting the receiver location.
Once a day, OpenWebRX+ queries RepeaterBook.com for the list of repeaters closest to the receiver location. These repeaters are shown with ⋈ markers on the map and with bookmarks in the main receiver window.
You can make OpenWebRX+ create repeater bookmarks by setting their maximum distance from the receiver in "Settings | General | Display | Repeater Bookmarks Range". OpenWebRX+ will only create bookmarks for repeaters located within the preset maximum distance.
You can also restrict repeater bookmarks to just a few profiles (such as VHF / UHF):
Disable global repeater bookmarks by setting "Settings | General | Display | Repeater Bookmarks Range" to zero.
Go to "Settings | SDR Devices and Profiles | <Device> | <Profile>" and add an option called "Repeater Bookmarks Range" by clicking on Add.
Set the newly added option to the maximum distance from the receiver where you would like to see repeaters and save profile settings by clicking on Apply and Save.
It is important to note that the repeaters will only show correctly if you set the correct receiver location in "Settings | General | Receiver Information | Receiver Location". It is also important to remember that since OpenWebRX+ queries the RepeaterBook.com once a day, the up-to-date repeater information may not be available immediately after setting the receiver location.
For mobile installations, OpenWebRX+ contains rudimentary tools to configure up to four WiFi connections, in addition to the already existing connections. This functionality is available via "Settings | WiFi Setup".
If, after a while, none of the WiFi connections become active, OpenWebRX+ will establish a self-hosted WiFi access point with the address of 192.168.10.1. The name and the password of this access point are configured via "Settings | WiFi Setup". If you move your OpenWebRX+ computer a lot, it is suggested to keep the access point option enabled all the time, so that you never lose access to the radio.
In order for the WiFi setup to work, you will need to add OpenWebRX+ to the "netdev" user group as follows:
sudo usermod -a -G netdev openwebrx
If the above command does not make OpenWebRX+ WiFi setup work, you may also need to edit the PolKit configuration file:
sudo nano /etc/polkit-1/localauthority/50-local.d/org.freedesktop.NetworkManager.pkla
adding the following content:
[nm-applet]
Identity=unix-group:netdev
Action=org.freedesktop.NetworkManager.*
ResultAny=yes
ResultInactive=no
ResultActive=yes
As a server administrator, you may have legal or technical reasons to restrict your OpenWebRX server use by the public. Always check what radio frequencies and modes you are allowed to listen to at your location. Do not offer prohibited frequencies and modes to the public. Following restrictions are available in the "Settings | General | Receiver Limits":
Maximum Number of Clients
This setting determines how many people can connect to your OpenWebRX
server at once. Anyone trying to connect to a "full" server will be
shown an error message and refused service.
Maximum Number of Files
This setting determines how many SSTV images, faxes, and other files
received from the air OpenWebRX+ is allowed to keep before it starts
deleting oldest files. The received files can be seen by pressing the
Files button at the top of the receiver web
page.
Session Timeout
This value, in seconds, determines how long a user is allowed to use the
OpenWebRX+ receiver. Reloading receiver's web page restarts the time
though, so the timeout is mostly there for people who leave their
computers with the OpenWebRX+ page open.
Usage Policy URL
This web page is shown to a user once their session times out. The
default page explains why there is a timeout and lets users find other
online receivers to listen to.
Allow users to chat with each other
Disable this option if you want to disable the built-in chat facility.
When disabled, the chat panel turns into the log panel that does not
accept any input.
Allow users to record received audio
Disable this option if you do not want your users to record any audio
they are listening to. When disabled, the REC
button will disappear from the user interface. Please, do keep in mind
that this does not prevent your users from recording their audio
by some other means.
Allow users to change center frequency
Enable this option if you would like to let your OpenWebRX+ users
"side-step" their current profile by right-clicking the round arrow
buttons. Since this change will occur to all the users listening to the
same profile, it makes sense to disable it on the servers with many
people listening to the same profiles.
Magic Key
When the magic key string is filled in (i.e. not empty), OpenWebRX+ will
only allow side-stepping profiles to people who know the magic key and
provide it as follows:
http://openwebrx.receiver.org:8073/#key=<magic-key>
OpenWebRX+ lets its administrator monitor connections to the server and ban abusive users. Please, note that since the main goal of the OpenWebRX project is to provide free, open online radio, this facility should be used with extreme care. If you want to have a truly private OpenWebRX server, consider closing it to public access instead.
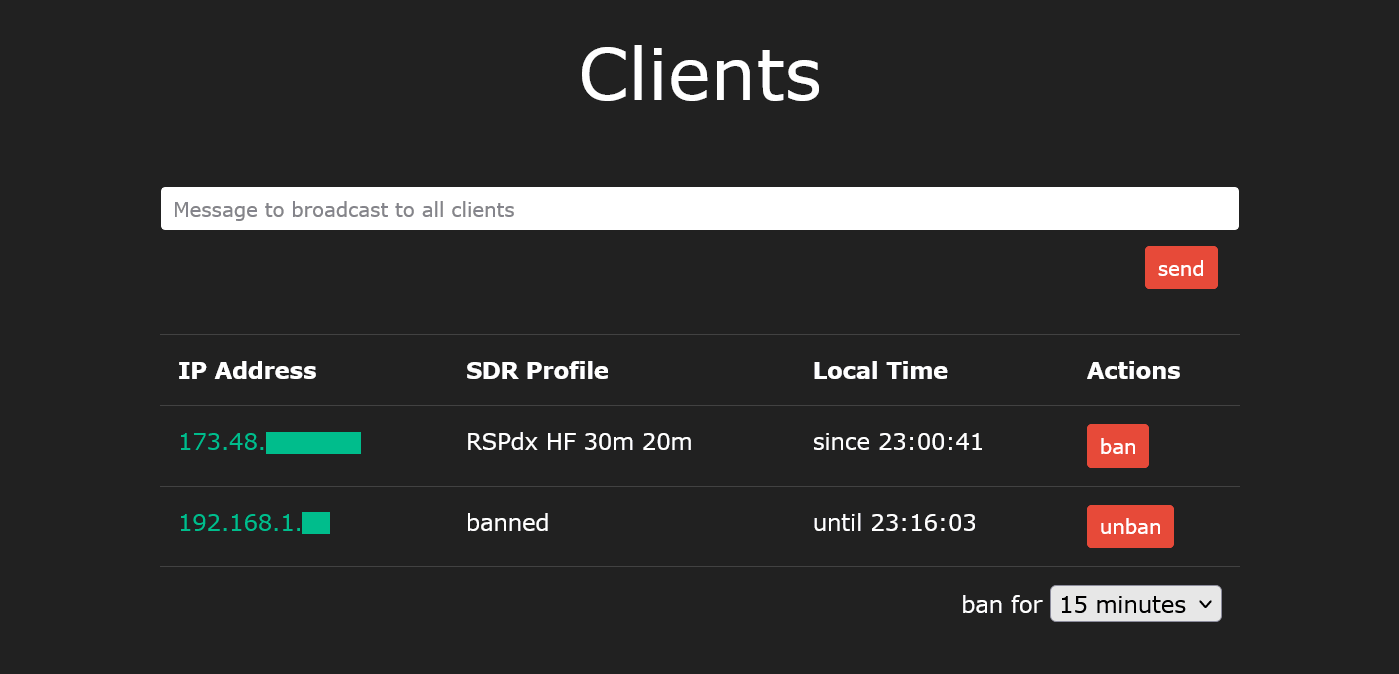
In order to see currently connected clients, click on the Settings button and scroll to the bottom of the page, until you see the "Clients" display, as shown above. There, you will be able to ban client's IP address for a selected amount of time, or unban previously banned addresses. A banned client will still be able to see the map and files, but won't be able to access the receiver itself.
You can also broadcast a message to all currently connected clients by entering it into the input field and clicking the send button. Your message will show up in clients' log / chat panels.
If you are running OpenWebRX+ behind NGINX, you may not be able to see clients' IP addresses unless you edit this file:
sudo nano /etc/nginx/sites-enabled/openwebrxand add the following line to the location section:
proxy_set_header X-Forwarded-For $proxy_add_x_forwarded_for;
As discussed earlier, OpenWebRX can report received data to an MQTT broker. The data for each mode is sent under the "openwebrx/<mode>" topic. For example, FT8 data is reported as "openwebrx/FT8". A typical report will look as follows:
{
  "mode":      "FT8",
  "timestamp": 1722482895000,
  "freq":      7074985,
  "msg":       "CQ YV6BXN FK60",
  "callsign":  "YV6BXN",
  "locator":   "FK60"
}
The common fields present in most reports are:
In addition to reporting received data, OpenWebRX+ uses MQTT to report SDR device changes and other internal events. In order to use this feature, you have to enable the "Report server startup and SDR profile changes" option in "Settings | Spotting and Reporting | MQTT Settings". When an OpenWebRX+ server starts up or shuts down, it sends the following event under the "openwebrx/RX" topic:
{
  "mode":      "RX",
  "timestamp": 1722737506393,
  "version":   "v1.2.64",
  "state":     "ServerStarted"
}
The "state" parameter above can be either "ServerStarted" or "ServerStopped". OpenWebRX+ also reports SDR device changes that can be used by various automation scripts. Thus, an SDR profile change will be reported as follows:
{
  "mode":       "RX",
  "timestamp":  1722483751451,
  "source_id":  "rspdx",
  "source":     "RSPdx",
  "profile_id": "air-1",
  "profile":    "Air Band 118-120",
  "freq":       118900000,
  "samplerate": 2000000
}
The most important fields in the above event are:
When an SDR device starts or stops operating, a state change event is sent to MQTT:
{
  "mode":      "RX",
  "timestamp": 1722483751451,
  "source_id": "rspdx",
  "source":    "RSPdx",
  "state":     "Running"
}
As seen above, the state change event is very similar to a profile change, but carries SDR state instead of profile information.
OpenWebRX+ reports user activities under the "openwebrx/CLIENT" topic. In order to use this feature, you have to enable the "Report clients connecting to the server" option in "Settings | Spotting and Reporting | MQTT Settings". A user connecting or disconnecting from the server will then be reported as follows:
{
  "mode":      "CLIENT",
  "timestamp": 1722738356255,
  "ip":        "::ffff:101.23.45.67",
  "state":     "Connected",
  "banned":    false
}
The "state" parameter can be either "Connected" or "Disconnected". When a user sends a chat message, that message is similarly reported under the "openwebrx/CLIENT" topic:
{
  "mode":      "CLIENT",
  "timestamp": 1722738521609,
  "ip":        "::ffff:101.23.45.67",
  "name":      "Nickname",
  "message":   "The message text.",
  "state":     "ChatMessage",
  "banned":    false
}
The MQTT broker connection can also be used to receive data sent by other OpenWebRX+ servers. To set up this feature, follow these steps:
Configure each of your OpenWebRX+ servers to connect to the same, private MQTT broker. The privacy is important here since some of the exchanged data, such as chat messages, may not be public.
Make sure that each of your OpenWebRX+ servers uses a different MQTT topic consisting of just one or two elements, such as "openwebrx/server1" or just "server1".
If you are planning to relay chat messages via MQTT, make sure to enable the "Report clients connecting to the server" option at each connected OpenWebRX+ server.
If you are planning to share received data, such as FT8 spots or APRS reports, make sure to set up the background decoding and a schedule at each OpenWebRX+ server responsible for receiving the actual data from the air.
Following options are available in the "Settings | Spotting and Reporting | MQTT Settings":
Receive chat messages
With this option enabled, OpenWebRX+ will show chat messages entered by
users at other OpenWebRX+ servers connected to the same MQTT broker.
Receive aircraft data
Enabling this option makes OpenWebRX+ show ADSB, ACARS, VDL2, HFDL, and
UAT data received by other connected OpenWebRX+ servers. This data will
show up at the map, as if received from the air.
Receive marine data
This option lets OpenWebRX+ show AIS position reports received by other
connected OpenWebRX+ servers. These ship positions will be displayed at
the map, as if they were received locally.
Receive APRS reports
With this option enabled, OpenWebRX+ will show APRS position reports
received by other connected OpenWebRX+ servers. These APRS positions
will be displayed at the map, as if they were received locally.
Receive WSJT decodes
When receiving WSJT decodes from MQTT, the map will show FT8, FT4, and
other WSJT spots reported by other connected OpenWebRX+ servers. These
non-local spots will be grayed out to differentiate them from locally
received spots.
Stanislav Lechev (LZ2SLL) has developed a JavaScript plugins framework for OpenWebRX+. There is a bunch of plugins available from his GitHub repository. JavaScript plugins operate in a browser at the client side, rather than the server side, and allow to customize user interface. In order to enable JavaScript plugins, rename the following file:
htdocs/plugins/receiver/init.js.sample
into init.js and edit it to enable or disable individual plugins. The plugins themselves are stored in the following folders:
htdocs/plugins/receiver
Plugins placed into this folder will be loaded into the main receiver
page.
htdocs/plugins/map
Plugins placed into this folder will be loaded into the map view page.
For HAM operators, OpenWebRX+ offers a way to send tuning frequency and modulation changes to a transceiver rig connected to the OpenWebRX+ server. This is done using Hamlib tools, so you will need to install Hamlib prior to enabling rig control in OpenWebRX+.
Please, keep in mind that unless you are running a private OpenWebRX+ server, letting it control your transceiver is not the best idea, even though OpenWebRX+ cannot be used to trigger actual radio transmission.
Once you have installed Hamlib and connected your transceiver to the OpenWebRX+ server, go to "Settings | Spotting and Reporting | RigControl Settings" and select your transceiver model. Then enter the name of a Linux device your rig is connected to (serial, USB, etc). For network-connected rigs, enter column-separated IP address and port instead.
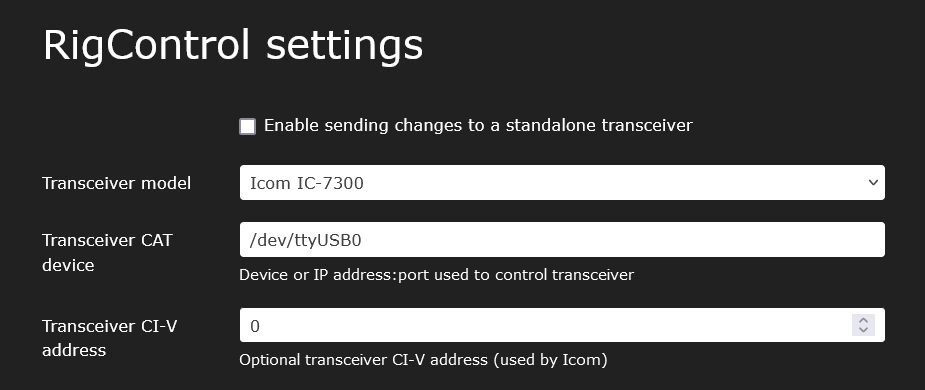
If OpenWebRX+ is unable to open your Linux device due to access restrictions, check what group that device belongs to and add the "openwebrx" user to the same group:
$ ls -l /dev/ttyUSB0
crw-rw---- 1 root dialout 188, 0 Jan  7 15:28 /dev/ttyUSB0
$ sudo usermod -a -G dialout openwebrx
At this point, you can enable global rig control for all SDR devices and profiles by checking the "Enable sending changes to a standalone transceiver" option. Most HAM operators would like to restrict rig control to certain (shortwave) profiles though. To do that, keep the global enable option off. Go to a desired profile instead and add the "Enable sending changes to a standalone transceiver" option there.
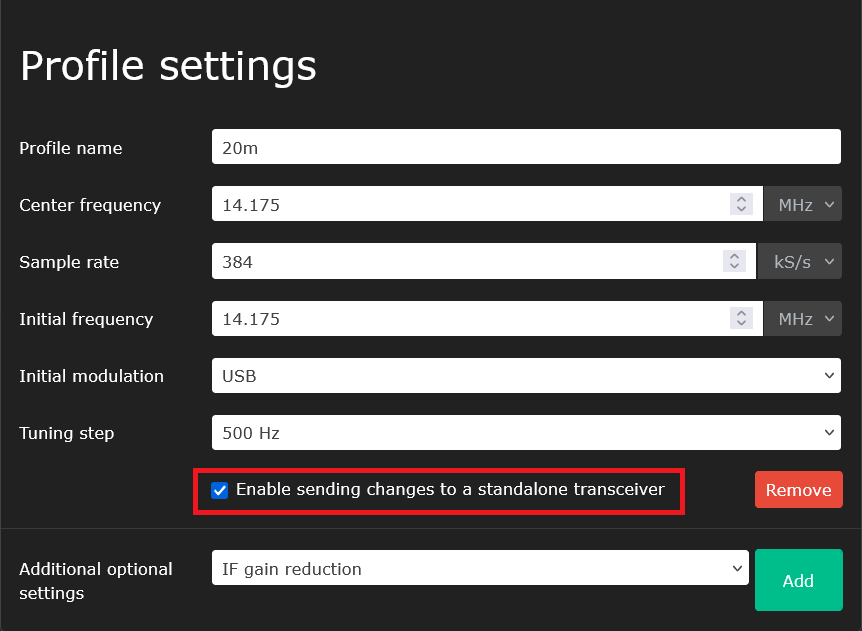
To receive satellite weather maps, OpenWebRX+ integrates with the SatDump satellite decoder. Unfortunately, since SatDump is not a real-time tool, the online decoding is not possible. Hence, the users of your receiver will not be able to make use of SatDump and that is why OpenWebRX+ satellite data support is only available for backup decoding.
If you are running a private OpenWebRX+ server and would like to use it to receive satellite data, you can manually enable SatDump support and receive satellite weather images as follows:
Install SatDump by following instructions from the official GitHub repository. You can also try installing SatDump from packages available at their downloads page, but these may not work on your specific Linux flavor. Source code compilation is more reliable, although it does take a significant amount of time.
Enable background decoding for selected satellites by checking them in "Settings | Background Decoding".
Enable running background services on a chosen SDR device via "Settings | SDR Devices and Profiles | <Device>", add a schedule to this device, and create schedule entries for the satellites you would like to receive and decode.
All received data is stored in the "/tmp/satdump" folder. For the NOAA decoder, you will see complete images there. For the METEOR decoder, you will get a .CADU file with data. Use SatDump on your personal computer to convert this file to actual images.
This section attempts to answer some common questions asked by OpenWebRX users. Please, consult with it before seeking help in online forums or chat groups.
Before seeking online help from other OpenWebRX users, please, consider the following steps:
Read other FAQ articles in this document. There is a very good chance they offer solutions to your problems.
Wait for a day or two, maybe things start working, as they often do.
If you are not familiar with Linux and do not want or cannot learn, find a friend familiar with Linux who can offer you hands-on help.
If you are familiar with Linux, look at OpenWebRX logs by typing the following command:
sudo journalctl -u openwebrx
If you need even more log output, edit the following file:
sudo nano /etc/openwebrx/openwebrx.confand set the log_level in the [core] section:
[core]
log_level = DEBUG
Then save the edited file and restart OpenWebRX.
If you still need help, ask for it in the Telegram channel or create a separate thread in the forum. Make sure you provide service logs obtained with the above command, as a file, to whoever will be willing to help you.
In a desktop browser, try reloading receiver web page while holding the SHIFT key. In a mobile browser, clear browser cache and reload the page. If this does not help, try restarting the computer running OpenWebRX.
Click on "Settings | Feature Report" and see if the features you are interested in show up as enabled there. If a feature is disabled, the report will tell you what you should do to enable it.
Digital voice modes (DMR, D-STAR, YSF, NXDN) require AMBE codec algorithms patented by Digital Voice Systems Inc. Because of that, neither OpenWebRX nor OpenWebRX+ include digital voice support out of the box. It is your personal responsibility to add necessary pieces to your own OpenWebRX installation.
The proper, legally responsible way to add digital voice modes to OpenWebRX is to attach a licensed USB dongle that implements AMBE codecs in the hardware. Both OpenWebRX and OpenWebRX+ will support common AMBE dongle models with minimal configuration effort.
If you do not wish to use an AMBE codec dongle for whatever reason, there is an unlicensed MBELib software implementation with rather questionable origins. The MBELib use may be interpreted as a patent violation. If you are ok with it, there is a script that adds MBELib support to OpenWebRX. Run it as follows:
sudo install-softmbe.sh
After installing digital voice support by either method, visit "Settings | Feature Report" page to verify that the installation succeeded. You should now see digital voice buttons at the receiver web page.
OpenWebRX relies on a good, stable network connection in order to deliver audio and waterfall data to your web browser. If that connection becomes unstable, as it often happens with wireless devices, the browser may stutter and disconnect from the OpenWebRX server. It will then attempt to reconnect and usually succeed.
This issue can be caused either by your own client connection, or by the server connection. It cannot be fixed by changes to the OpenWebRX code. If you have administrative rights to the OpenWebRX server in question, you can ease the problem by reducing waterfall resolution and using ADPCM compression for the audio and waterfall data.
In order to conserve power, most mobile web browsers severely limit performance and functionality of background web pages. Thus, as soon as you switch away from the OpenWebRX web page on a mobile device, its network access will be slowed down and JavaScript scripts eventually stopped.
This issue cannot be fixed by changes to the OpenWebRX code. If you are using an Android device, consider using OpenWebRX Client App for Android that is mostly free of power management limitations. If you keep experiencing problems even with the Android app, go into Android Settings, bring up the app info, and do the following:
The above settings may appear under different names, depending on the device make, model, and Android version.
SDRplay devices and their clones are notoriously glitchy and require a good power source for reliable operation. If you experience timeouts or failures with these devices, try connecting them via a powered USB hub. If this does not help, and you have a genuine SDRplay device (not a clone), open a ticket at the SDRplay website. OpenWebRX developers cannot help you with SDRplay hardware issues.
In general, no. OpenWebRX is a non-profit project, developed by very few people in their spare time. These developers will prioritize features they find personally interesting, repeatedly requested by a lot of people, or easy to implement.
Having said that, there is high probability that the feature you want is either already implemented, or can be achieved by some other means, or has been considered and avoided for some reason. Please, carefully read this document, especially the FAQ section.
Also, since OpenWebRX is an open-source project, nothing prevents you from adding features you want on your own. Take a look at the original OpenWebRX source code or the OpenWebRX+ source code and consider participating in the OpenWebRX development.
Since OpenWebRX is an open online receiver, it does not let you hide profiles from the public. If you would like to have private access to your receiver, the best option is to make it inaccessible from the Internet.
Having said that, there is an option to prevent users from changing profiles on a specific SDR device connected to OpenWebRX+. It comes useful if this SDR device performs background decoding and changes profiles based on its own schedule. To enable this option, do the following:
Go to "Settings | General Settings | Receiver Limits | Magic Key" and set the magic key value you would like to use to force switching profiles on a protected device.
Go to "Settings | SDR Devices and Profiles | <Device>", select "Require magic key to switch profiles on this device" from the "Additional Optional Settings" and click on Add.
Make sure the "Require magic key to switch profiles on this device" checkbox is checked, then click on Apply and Save.
From now on, users can only change profiles on the device by providing the preconfigured magic key value in the URL, as follows:
http://openwebrx.receiver.org:8073/#key=<magic-key>
Since OpenWebRX works in terms of "profiles", i.e. preconfigured ranges of frequencies, you cannot jump to an arbitrary frequency because that new frequency may require different profile settings. Also, other users listening to the same profile may not appreciate you jumping to a completely new frequency.
Nevertheless, OpenWebRX+ does offer a way to "side-step" the current profile, going to adjacent frequencies. In order to enable side-stepping, do the following:
Go to "Settings | General Settings | Receiver Limits" and make sure the "Allow users to change center frequency" checkbox is checked.
If you would like to protect frequency changes with a magic key, enter it in the adjacent "Magic Key" field.
Click on Apply and Save to save changes.
From now on, you can step outside the preconfigured frequency range by right-clicking the large round arrows at the top of the receiver web page. Mobile users, who do not have a mouse, can simply hold these large round arrows with their finger for about a second.
If a magic key is configured, you will only be able to side-step profiles when providing that key in the URL, as follows:
http://openwebrx.receiver.org:8073/#key=<magic-key>
Due to the way OpenWebRX operates, you cannot just enter any frequency into the input field and expect it to work. The entered frequency must be within the current profile to work. Please, see above for the reasons.
For a special case where you have allowed OpenWebRX+ to step outside the preconfigured frequency range, entering an arbitrary frequency can be enabled with a JavaScript plugin.
If you wish to backup OpenWebRX configuration files, they are located as follows:
/var/lib/openwebrx/settings.json
/var/lib/openwebrx/bookmarks.json
/var/lib/openwebrx/users.json
/etc/openwebrx/openwebrx.conf
/etc/openwebrx/bands.json
/etc/openwebrx/bands-r1.json
/etc/openwebrx/bands-r2.json
/etc/openwebrx/bands-r3.json
You should avoid editing configuration files by hand, since they are normally modified via web-based settings interface. If you do decide to edit configuration files, always make sure you have backup copies first. After updating configuration files, restart OpenWebRX with:
sudo systemctl restart openwebrx
While the original OpenWebRX version does not support HTTPS protocol, OpenWebRX+ does. In order to enable HTTPS in OpenWebRX+, you will need the SSL certificate file (cert.pem) and the key for it (key.pem). Once you have these two files, do the following:
sudo cp <cert.pem> /etc/openwebrx/cert.pem
sudo cp <key.pem> /etc/openwebrx/key.pem
sudo chown openwebrx:openwebrx /etc/openwebrx/cert.pem
sudo chown openwebrx:openwebrx /etc/openwebrx/key.pem
sudo chmod 660 /etc/openwebrx/cert.pem
sudo chmod 660 /etc/openwebrx/key.pem
sudo systemctl restart openwebrx
OpenWebRX+ comes with predefined bookmarks for some common frequencies, such as weather information, CB channels, and so on. If you do not like to see these bookmarks, delete them and restart OpenWebRX+ as follows:
sudo rm -f /etc/openwebrx/bookmarks.d/*
sudo systemctl restart openwebrx
If you only want to get rid of some bookmarks, delete or edit individual files in the /etc/openwebrx/bookmarks.d folder.
By default, OpenWebRX+ tries to determine the correct temperature sensor automatically. This works 99% of the time, but the remaining 1% may see their temperatures way outside the realistic range. To tell OpenWebRX+ which sensor to use, edit the following file:
sudo nano /etc/openwebrx/openwebrx.conf
adding the following line to the [core] section:
[core]
temperature_sensor=<full-path-to-your-temperature-sensor>
Then save the edited file and restart OpenWebRX+.
By default, OpenWebRX+ is configured to use a combined band plan that mostly applies to all three regions of the ITU world. If you would like to use a region-specific band plan instead, go to "Settings | General | Receiver Information | Receiver Band Plan" and select your region there. If you are still unhappy with the band plan or locations of the green bookmarks, you can change the default (combined) band plan by editing the following file:
sudo nano /etc/openwebrx/bands.json
There are also region-specific band plan files in the same folder. Prior to editing a file, make sure you create a backup copy, in case something goes wrong. After editing and saving a band plan file, restart OpenWebRX as follows:
sudo systemctl restart openwebrx